Deploy Browser Extensions via Addigy
This guide shows you how to create a Custom Profile in Addigy to force-install
the Anzenna browser extension on managed Mac computers. Addigy uses Apple's
standard .mobileconfig format, so the same XML payload structure
works for both Chrome and Edge — you just need separate profiles for each
browser.
Prerequisites
Addigy admin access with permission to create Custom Profiles
Target computers assigned to an Addigy Policy
Google Chrome or Microsoft Edge installed on target devices
Custom installation URL from Anzenna support
Before beginning deployment, contact Anzenna support to obtain a custom installation URL for your domain. This link is essential for the configuration process.
Overview
Addigy delivers browser extension policies as Custom Profiles in the Catalog.
You upload a .mobileconfig file containing the
ExtensionInstallForcelist key for your target browser, then
attach the profile to the Addigy Policies that should receive it.
Works for both Chrome and Edge — use a separate Custom Profile for each browser
The extension installs silently; users cannot remove it
Profiles apply on the next Addigy agent check-in
Step-by-Step Instructions
1. Generate the .mobileconfig Files
Paste the Anzenna-supplied installation link below, then
download a ready-to-upload .mobileconfig for each browser you
want to deploy. The downloaded files have all UUIDs and payload metadata
filled in — only the installation link is customer-specific.
Paste the link Anzenna support provided, then download one or both files. Each file is a ready-to-upload .mobileconfig.
The installation link format is extension-id;update-url. Contact
Anzenna support if you don't have it yet.
2. Add the Custom Profile to a Policy
- Log in to your Addigy dashboard
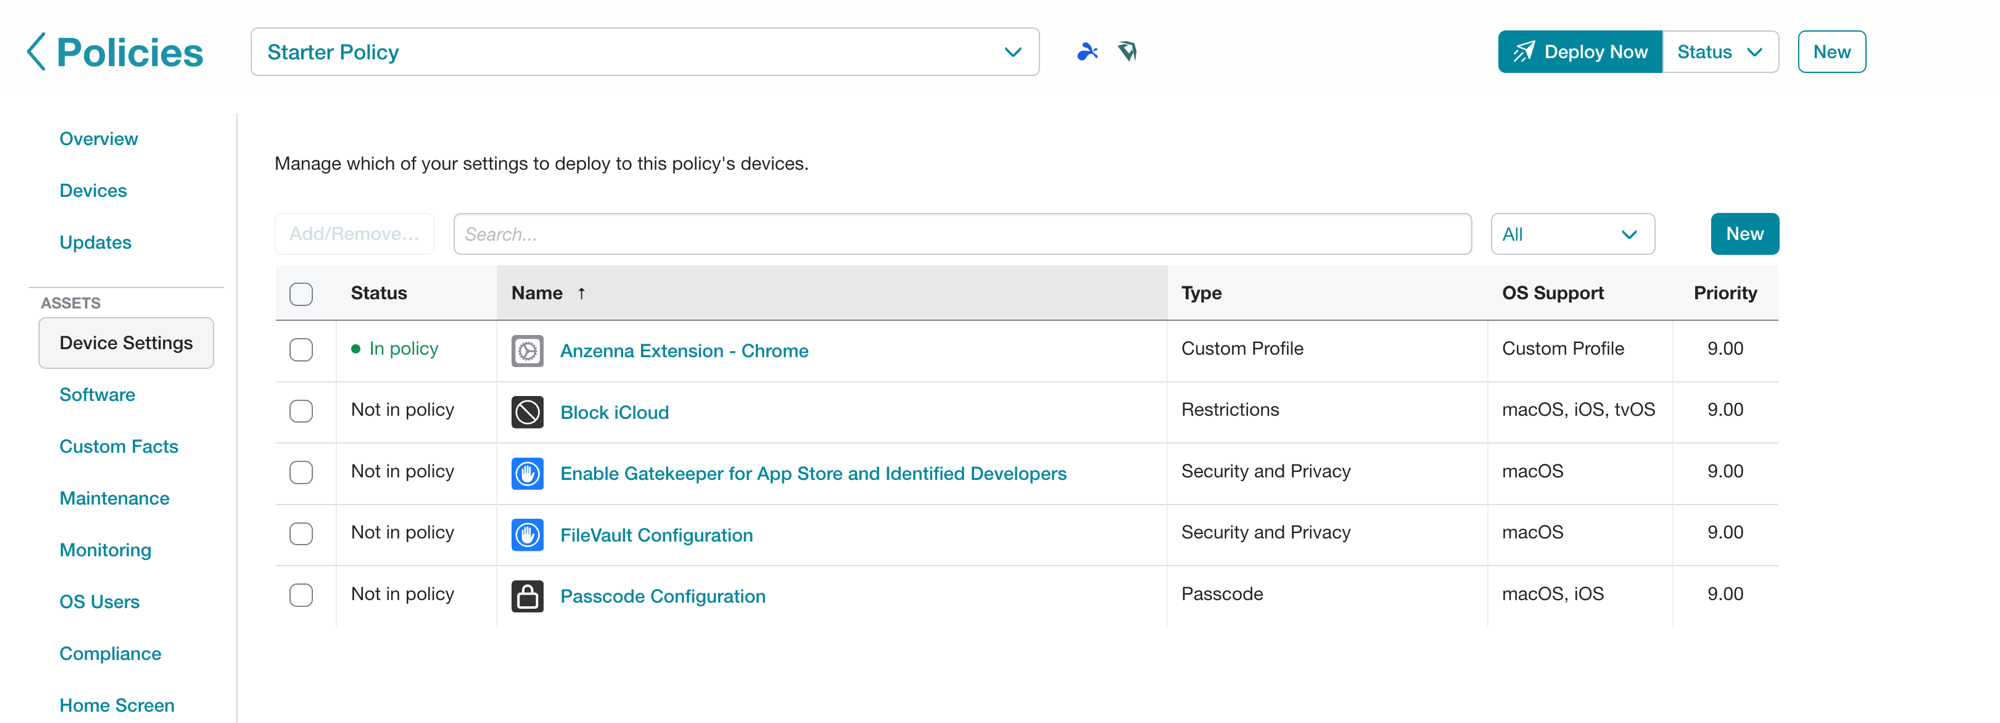
Navigate to Policies in the left sidebar and select the Policy that targets the computers that should receive the extension
In the left sidebar of the Policy view, under ASSETS, click Device Settings, then click New in the top-right
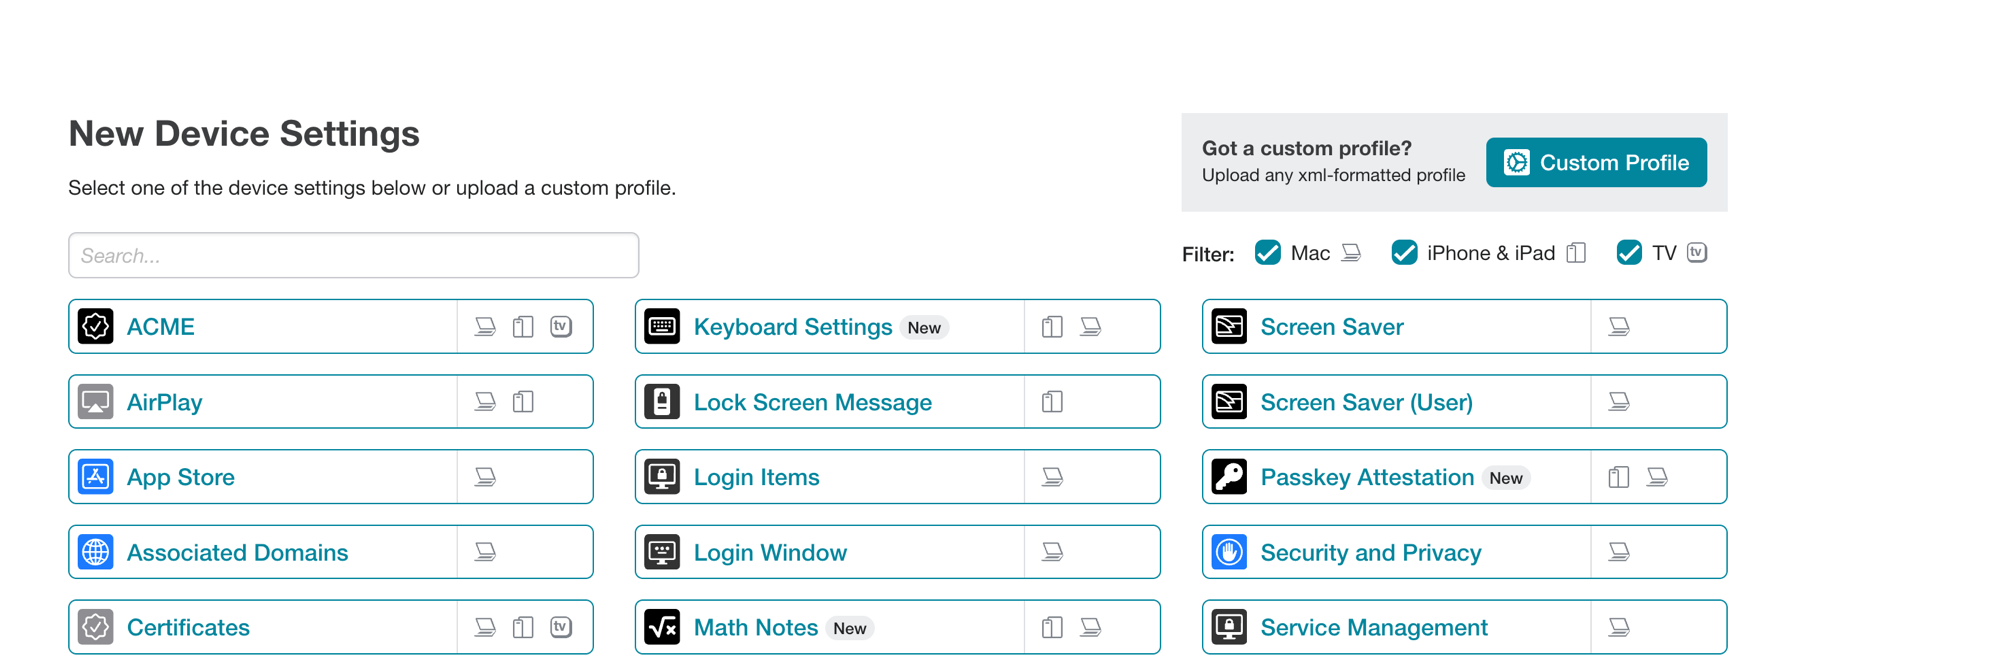
On the New Device Settings page, click Custom Profile in the "Got a custom profile?" panel on the top-right
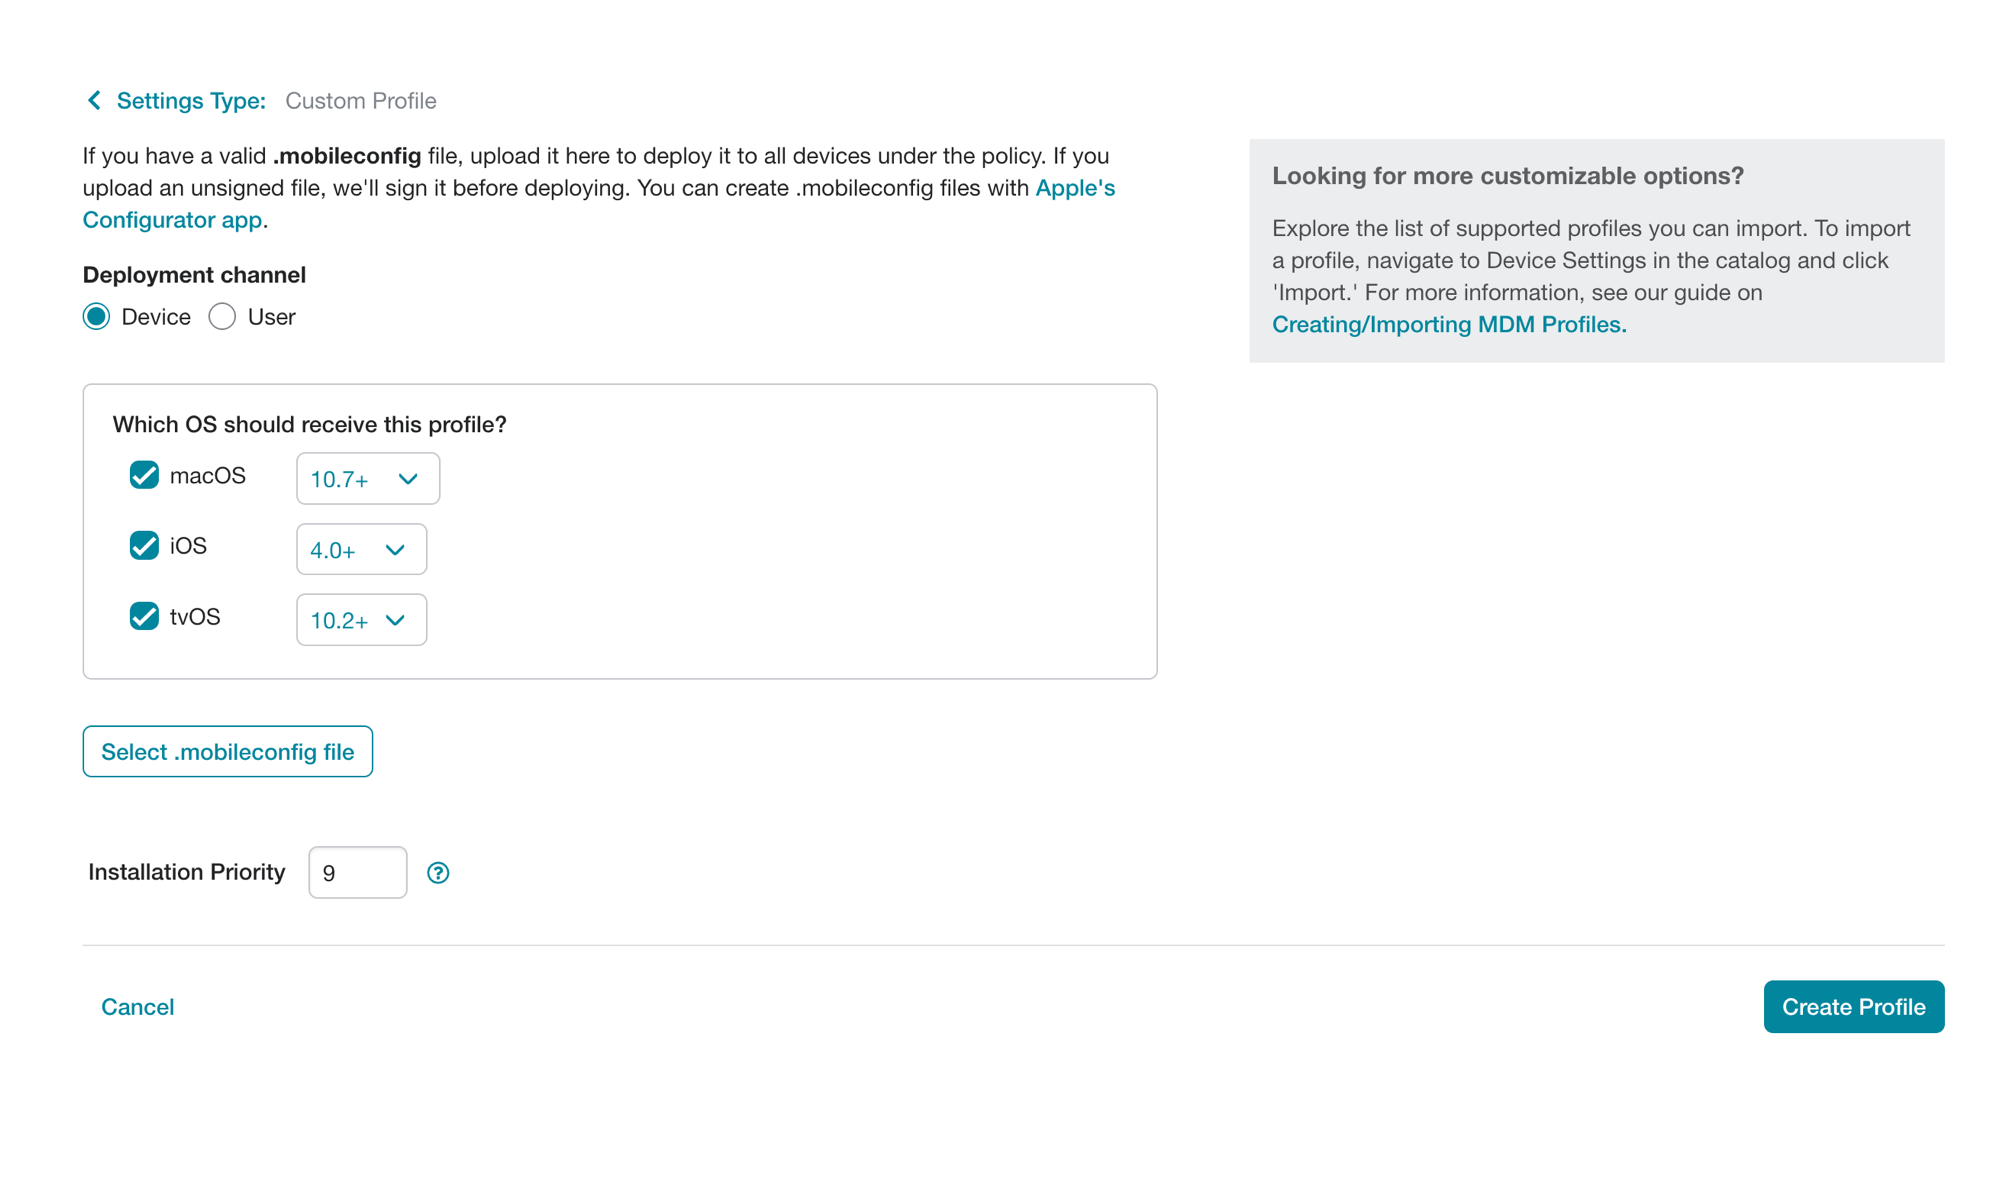
Leave the Deployment channel set to Device
Under Which OS should receive this profile?, leave macOS checked (the browser-extension policy only applies to Mac)
Click Select .mobileconfig file and choose the file you downloaded in step 1
Click Create Profile in the bottom-right
If deploying to both Chrome and Edge, repeat step 2 for each .mobileconfig file. Each browser requires its own Custom Profile.
Addigy pushes the profile to enrolled Macs on the next agent check-in (typically every 15–60 minutes). To force an immediate update, select the device in Addigy and click Run Policy or run sudo /Library/Addigy/go-agent -f on the managed Mac.
Verifying Deployment
Check Profile Status in Addigy
Navigate to Devices in Addigy and select a target device
Open the Profiles tab on the device detail view
Confirm your Anzenna Custom Profile appears in the list with status Installed
Verify on End-User Device (macOS)
Go to System Settings > General > Device Management
Locate the profile matching your
PayloadDisplayName(e.g., "Anzenna Extension - Chrome")Click the profile to confirm the
ExtensionInstallForcelistpayload is present
Verify in the Browser
Open Chrome and navigate to:
chrome://extensionsThe Anzenna extension will appear with a briefcase icon, indicating it is managed by your organization. The user cannot toggle it off or remove it.
Navigate to
chrome://policyand search for ExtensionInstallForcelist to confirm the extension ID is present
Open Edge and navigate to:
edge://extensionsThe Anzenna extension will appear with a briefcase icon
Navigate to
edge://policyto confirm the ExtensionInstallForcelist policy is active
Troubleshooting
Profile Not Appearing on Device
Confirm the device is assigned to the Policy that includes the Custom Profile
Trigger a manual agent check-in from the Addigy dashboard, or run
sudo /Library/Addigy/go-agent -fon the deviceReview the device's policy run history in Addigy for error messages
Incorrect Installation String Format
Verify the string is exactly
extension-id;update-url— no extra spaces, line breaks, or charactersThe update URL must be a direct link to an XML manifest file, not a browser Web Store landing page
Wrong Browser Targeted
Profile applies but the extension does not appear in the expected browser:
Chrome requires
PayloadType: com.google.ChromeEdge requires
PayloadType: com.microsoft.EdgeThese values must also match in
PayloadIdentifier. Update the XML, re-upload the file in Addigy, and re-save the Custom Profile.
Related Resources
Deploy Browser Extensions via Kandji
Deploy Browser Extensions via Jamf Pro
Deploy Chrome Extension via Google Admin
Deploy Edge Extension via Intune
Create Chrome Extension Policy in Intune
Addigy Support