Configure File Upload Capture (Microsoft Azure)
File Upload Capture archives a copy of every file your employees upload through the browser. Each file is encrypted on the device with your public key before it leaves the browser, and written directly to a Blob Storage container in your own Azure subscription. Anzenna mediates the upload but never holds the private key and never sees the file contents.
On Azure, Anzenna authenticates to your storage through Entra workload identity federation: you consent a multi-tenant Anzenna app into your tenant and grant it narrowly-scoped RBAC on one container. No keys, secrets, or SAS tokens are ever exchanged, and you can revoke access at any time.
Prerequisites
File Upload Capture must be turned on for your tenant first — contact Anzenna support at support@anzenna.ai before you begin.
An active Microsoft Azure subscription — this is where the Blob Storage account you create below lives. Every Azure subscription comes with a Microsoft Entra ID tenant (your organization's directory), and that tenant is what the "Entra" steps below act on.
You'll consent the Anzenna Application (client) ID into your tenant in Part 2:
245121cf-892e-4210-a296-88850ee586d3This is the same app for every customer — Anzenna authenticates into your tenant through it, and it requests no directory permissions.
You need an account with Application Administrator (or Global Administrator) in that Entra tenant to consent the app, and Owner or User Access Administrator on the subscription to create the role assignment.
The private key never leaves your custody. If every copy is lost, every file encrypted to the matching public key is unrecoverable — there is no Anzenna-side backdoor. Store the private key in a vetted password manager or HSM before registering the public key in Anzenna.
Step-by-Step Instructions
Part 1: Generate a recipient keypair
The extension encrypts each captured upload — using the
age encryption format
— to one or more recipient public keys that you register with Anzenna. The matching private keys stay with you and are used to decrypt archived files during an investigation.
Install the
ageCLI (Homebrew:brew install age; apt:apt install age).Generate the keypair to a protected file:
age-keygen -o anzenna-upload-archive.identityThe command prints the public key on stdout; the file contains the matching private key prefixed with
AGE-SECRET-KEY-1….Move
anzenna-upload-archive.identityinto a password manager entry or vault. Do not check it into source control or share it over chat.Copy the public key (the
age1…line printed during generation). That is what you will paste into Anzenna in Part 3.
Part 2: Provision the destination in Azure
You'll consent the Anzenna app into your tenant, provision a hardened storage account and a private container, and grant the app write access scoped to that one container.
Rather provision with Terraform? Use the Provision with Terraform (Microsoft Azure) guide instead — it creates the same Key Vault key, storage account, container, and RBAC grant in one terraform apply. Then come back and continue at Part 3 below.
2a. Consent the Anzenna app into your tenant
This creates a service principal — the local identity your RBAC grant in 2c will target. Run as an Application Administrator / Global Admin of your tenant:
az login --tenant <your-tenant-id>
az ad sp create --id 245121cf-892e-4210-a296-88850ee586d3

# verify the service principal now exists in your tenant
az ad sp show --id 245121cf-892e-4210-a296-88850ee586d3 --query "{name:displayName,id:id}" -o table
The /adminconsent endpoint returns AADSTS1003031: Misconfigured
required resource access. That is expected, not a bug — the Anzenna app
requests zero directory or API permissions, so the consent
screen has nothing to approve and refuses. az ad sp create
provisions the service principal directly, which is the correct path for a
permission-less workload app. A side benefit: Anzenna gets no access to your
directory — only the container-scoped storage RBAC you grant in 2c.
2b. Create the storage account and container
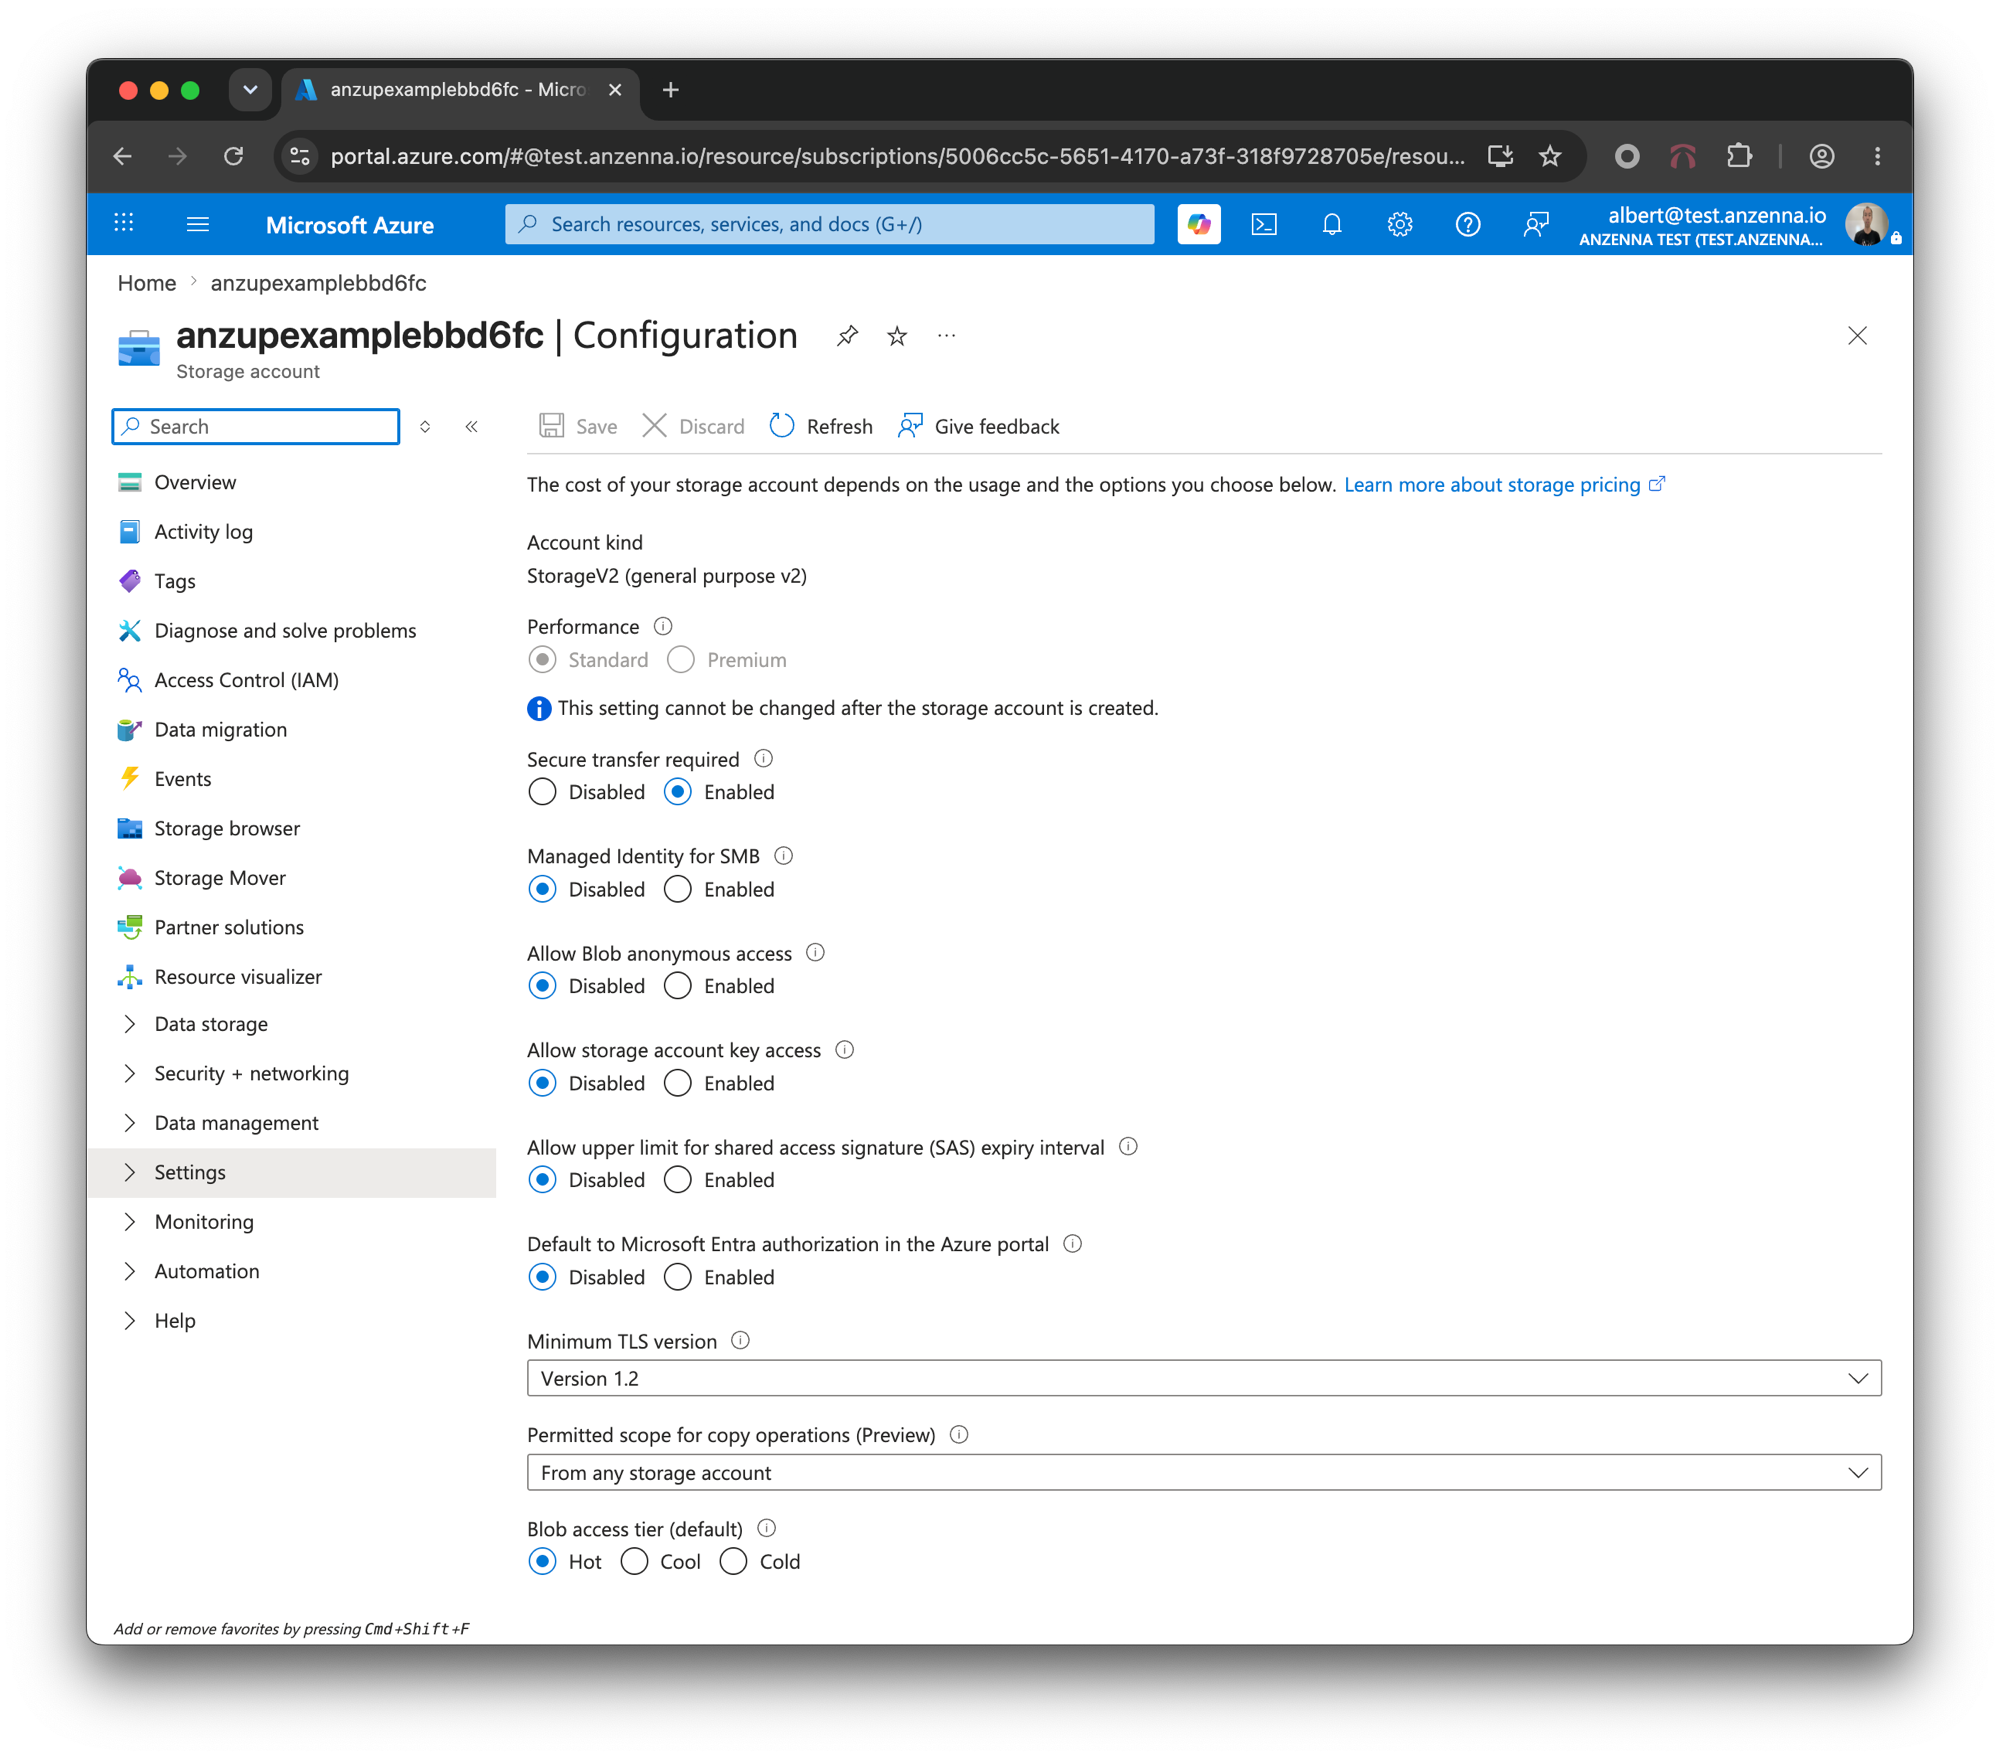
Create a storage account with this security posture, then a single private container for the archive. The portal path is Storage accounts > Create.
Require secure transfer (HTTPS only) and minimum TLS 1.2.
No anonymous / public blob access on the account and the container.
Disable shared-key access (set "Allow storage account key access" to Disabled). This forces Entra-only auth — no long-lived account keys exist to leak.
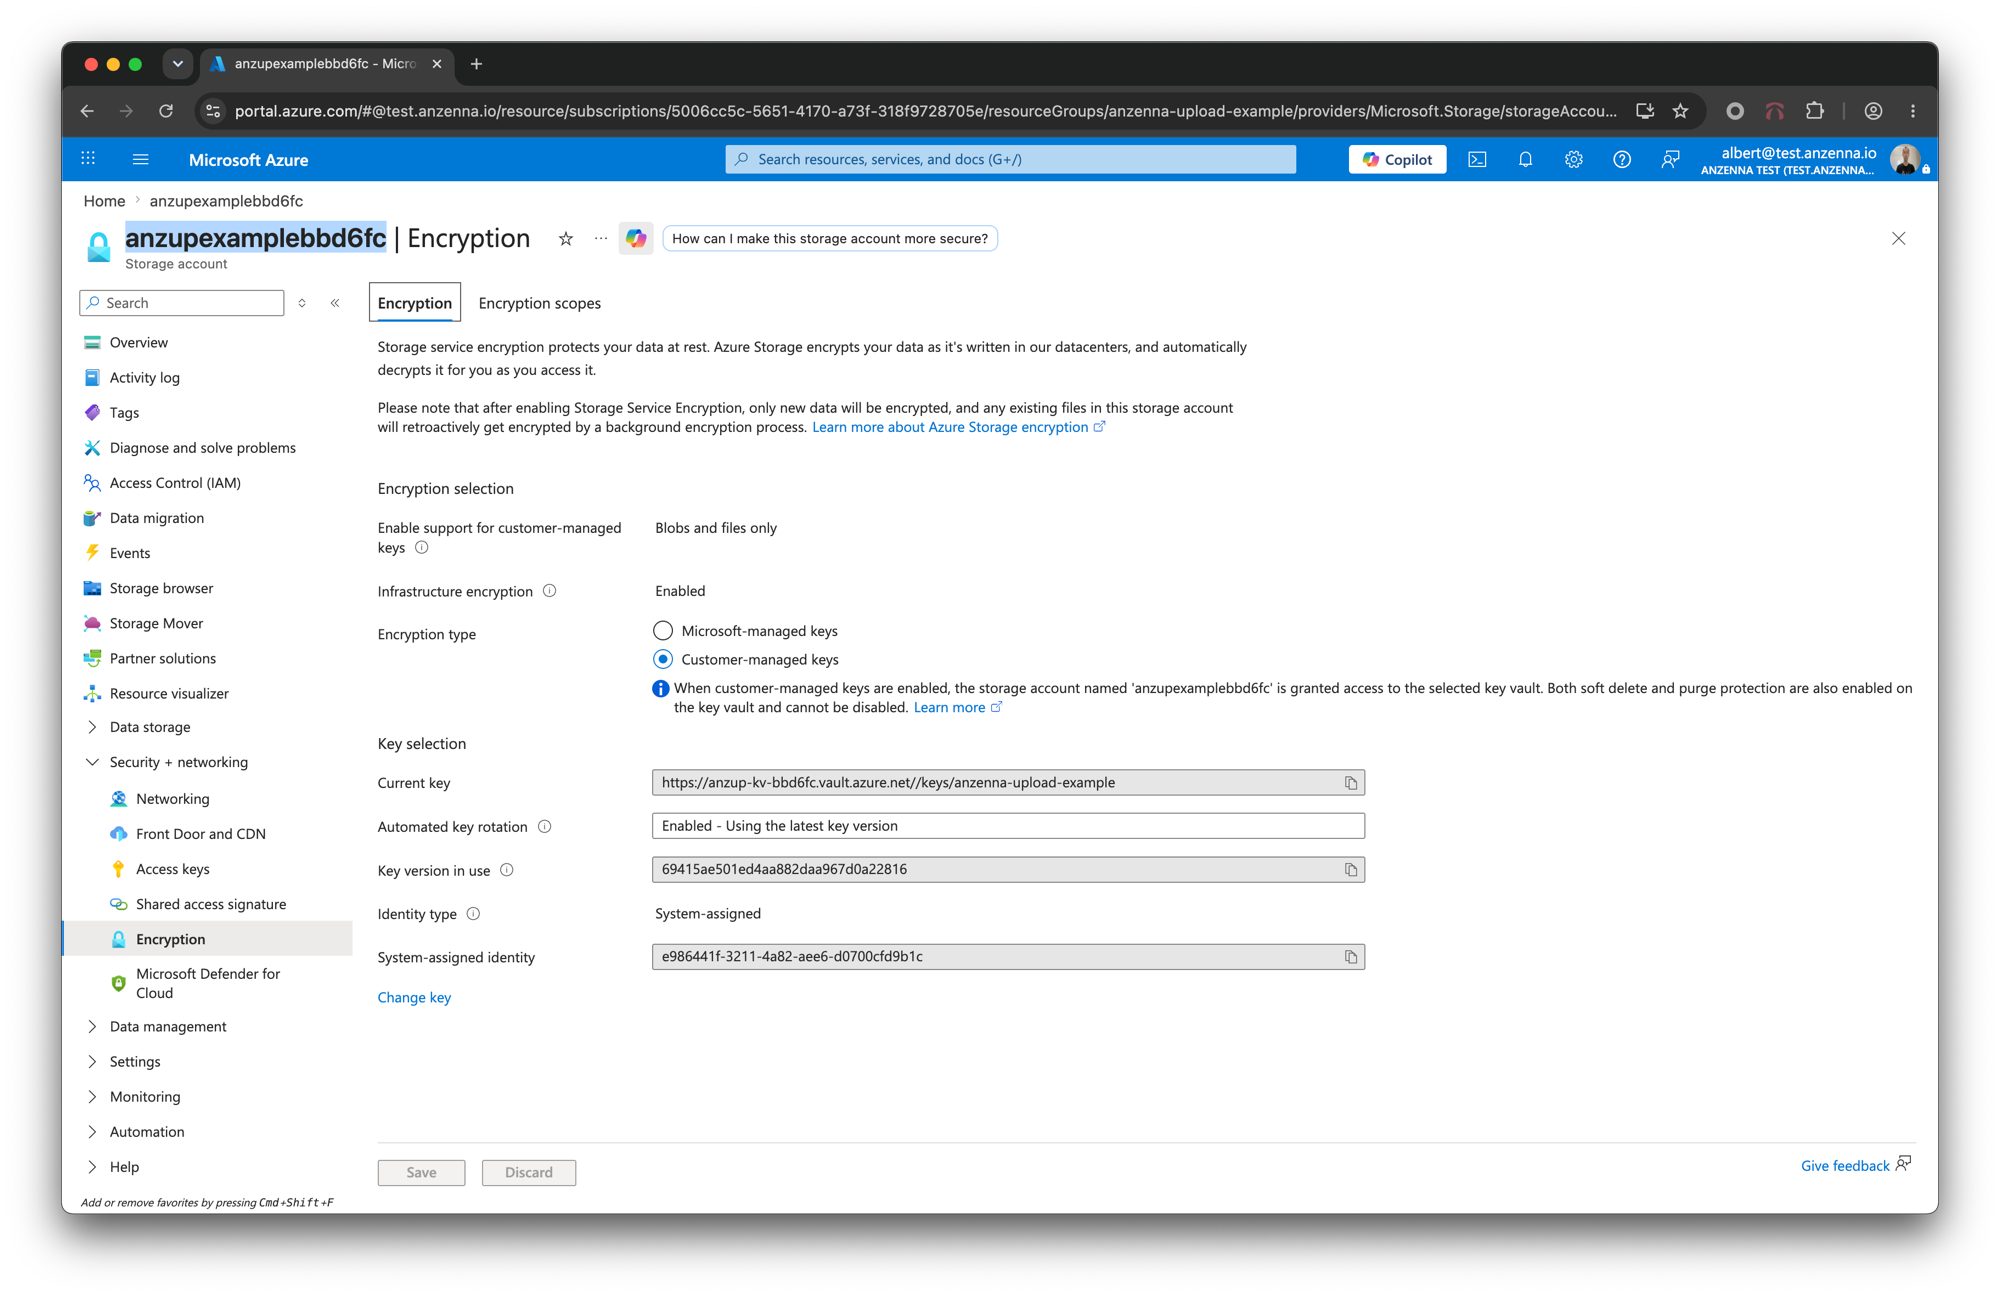
(Optional hardening) a customer-managed key (Key Vault) with infrastructure encryption. Not required for archiving to work — Azure already encrypts every blob at rest with Microsoft-managed keys by default; add a CMK only if your key-custody or data-residency policy calls for it.
Versioning and blob soft delete on; set a lifecycle expiry that matches your retention policy.
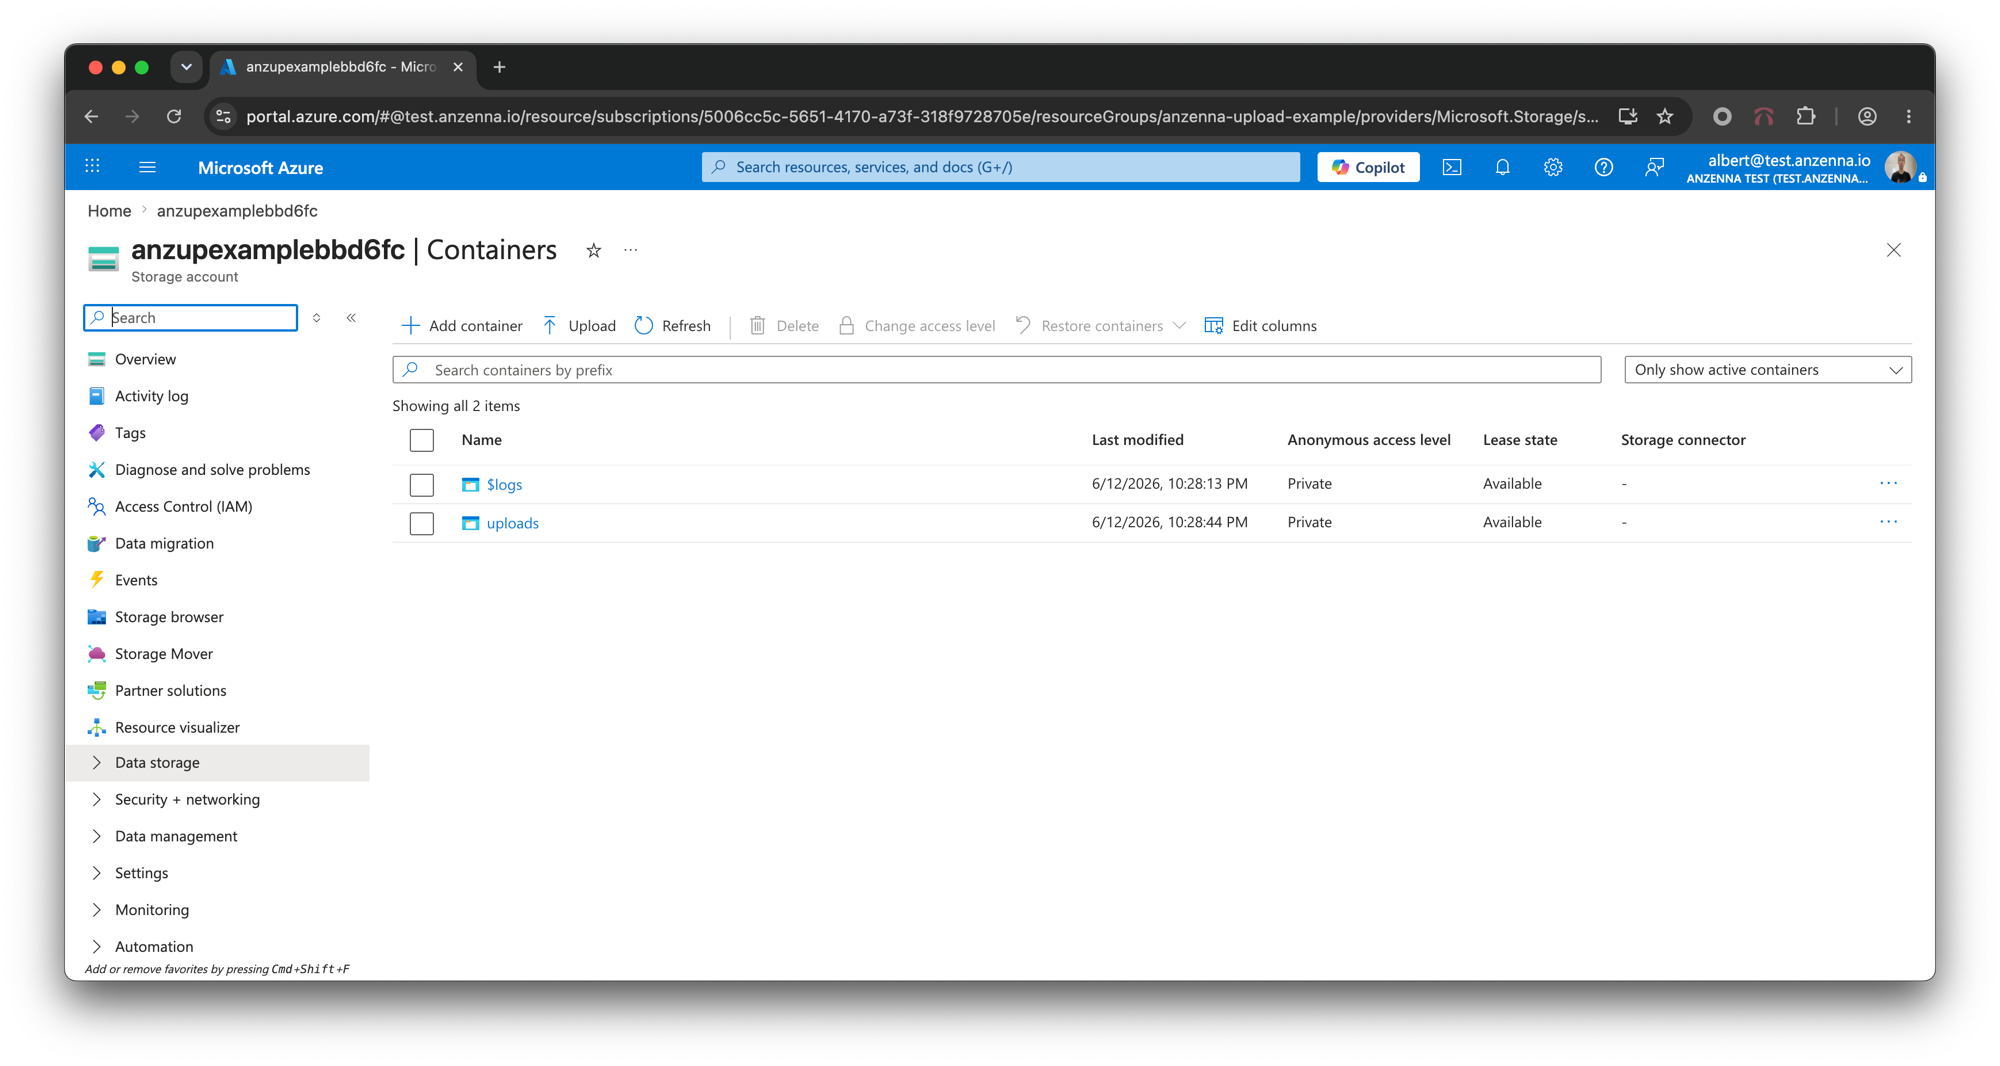
After the account is created, open it and go to
Data storage > Containers > + Container. Name it
uploads, set Public access level to
Private, and create it.
2c. Grant the Anzenna app write access (RBAC)
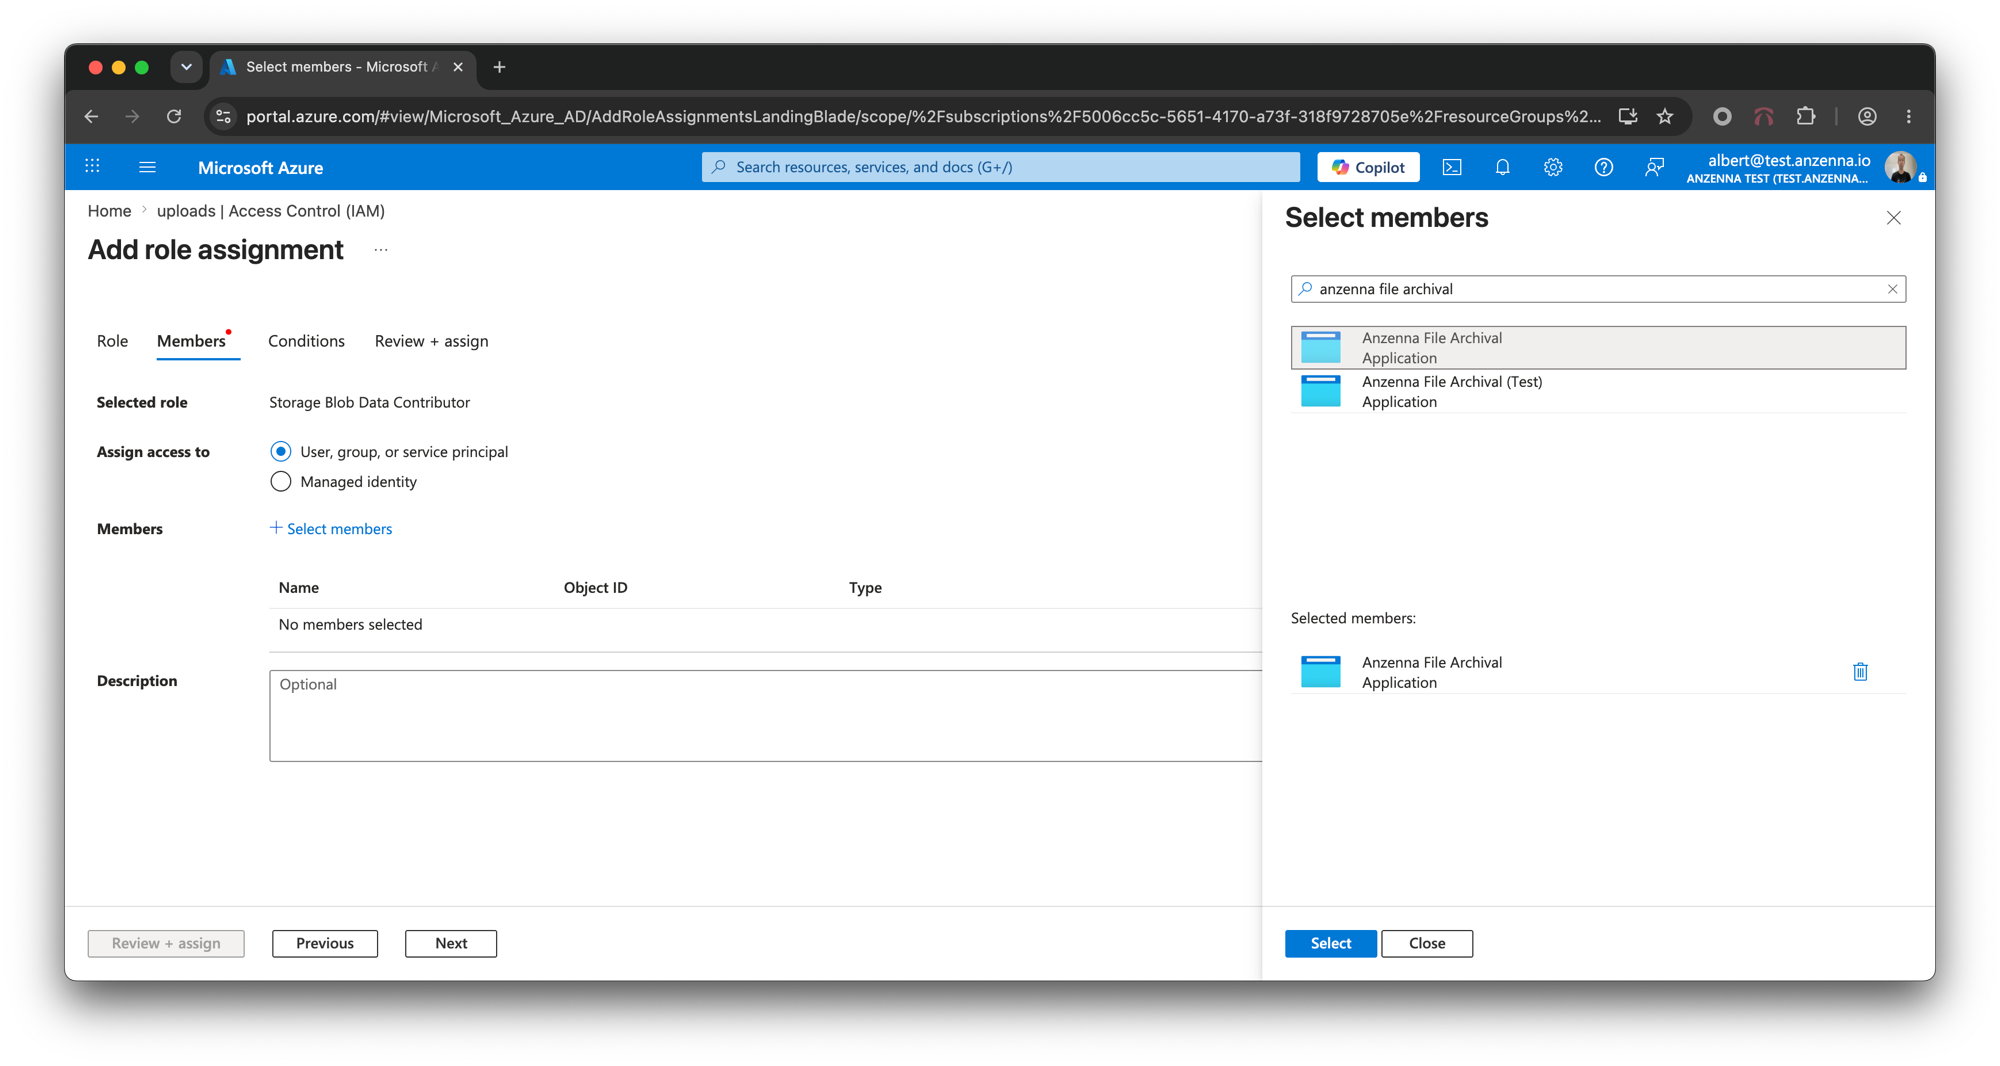
Assign Storage Blob Data Contributor to the consented Anzenna app, scoped to the container — not the account or subscription. This is least privilege: the app can write blobs to this one container and nothing else.
Open the container, go to Access Control (IAM) > Add > Add role
assignment, pick Storage Blob Data Contributor, then
on the Members tab click Select members and
search for Anzenna File Archival (or paste the client ID
245121cf-892e-4210-a296-88850ee586d3). Select it and finish on
Review + assign.
# the app's service principal object ID in YOUR tenant
SP_OID=$(az ad sp show --id 245121cf-892e-4210-a296-88850ee586d3 --query id -o tsv)

az role assignment create \
--assignee-object-id "$SP_OID" \
--assignee-principal-type ServicePrincipal \
--role "Storage Blob Data Contributor" \
--scope "/subscriptions/<sub>/resourceGroups/<rg>/providers/Microsoft.Storage/storageAccounts/<account>/blobServices/default/containers/uploads"
Part 3: Register everything in Anzenna
Log into
Anzenna
.
Navigate to Settings > Preferences > Browser Extension.
Find the File Upload Capture section.
3a. Add the recipient public key
Click Add new public key.
Acknowledge the private-key custody warning.
Paste the public key from Part 1 (starts with
age1…) and click Add key.Repeat for any additional recipients. Each archived file is a single blob — adding more recipients just means more private keys can decrypt that one blob, which is useful as a break-glass spare.
3b. Add the archive destination
Click Add destination and choose Azure Blob Storage as the provider.
Fill in the fields with the values from provisioning:
Storage account — your storage account name from 2b (e.g.
anzupexample…), the name only, not a URL.Container — the container you created in 2b,
uploads.Tenant ID — the Entra tenant that owns the storage account (a GUID). Get it with
az account show --query tenantId -o tsv, or copy it from Microsoft Entra ID > Overview in the Azure portal.Object key prefix — optional. Leave blank to write at the container root, or set a prefix (e.g.
archive/) to nest archived blobs under it.
Click Save destination.
Click Test destination. Anzenna authenticates with its federated token and writes a small test blob to the container. A green Test upload succeeded confirms the consent and RBAC grant are wired correctly. If it fails, the error names the specific Azure denial to fix.
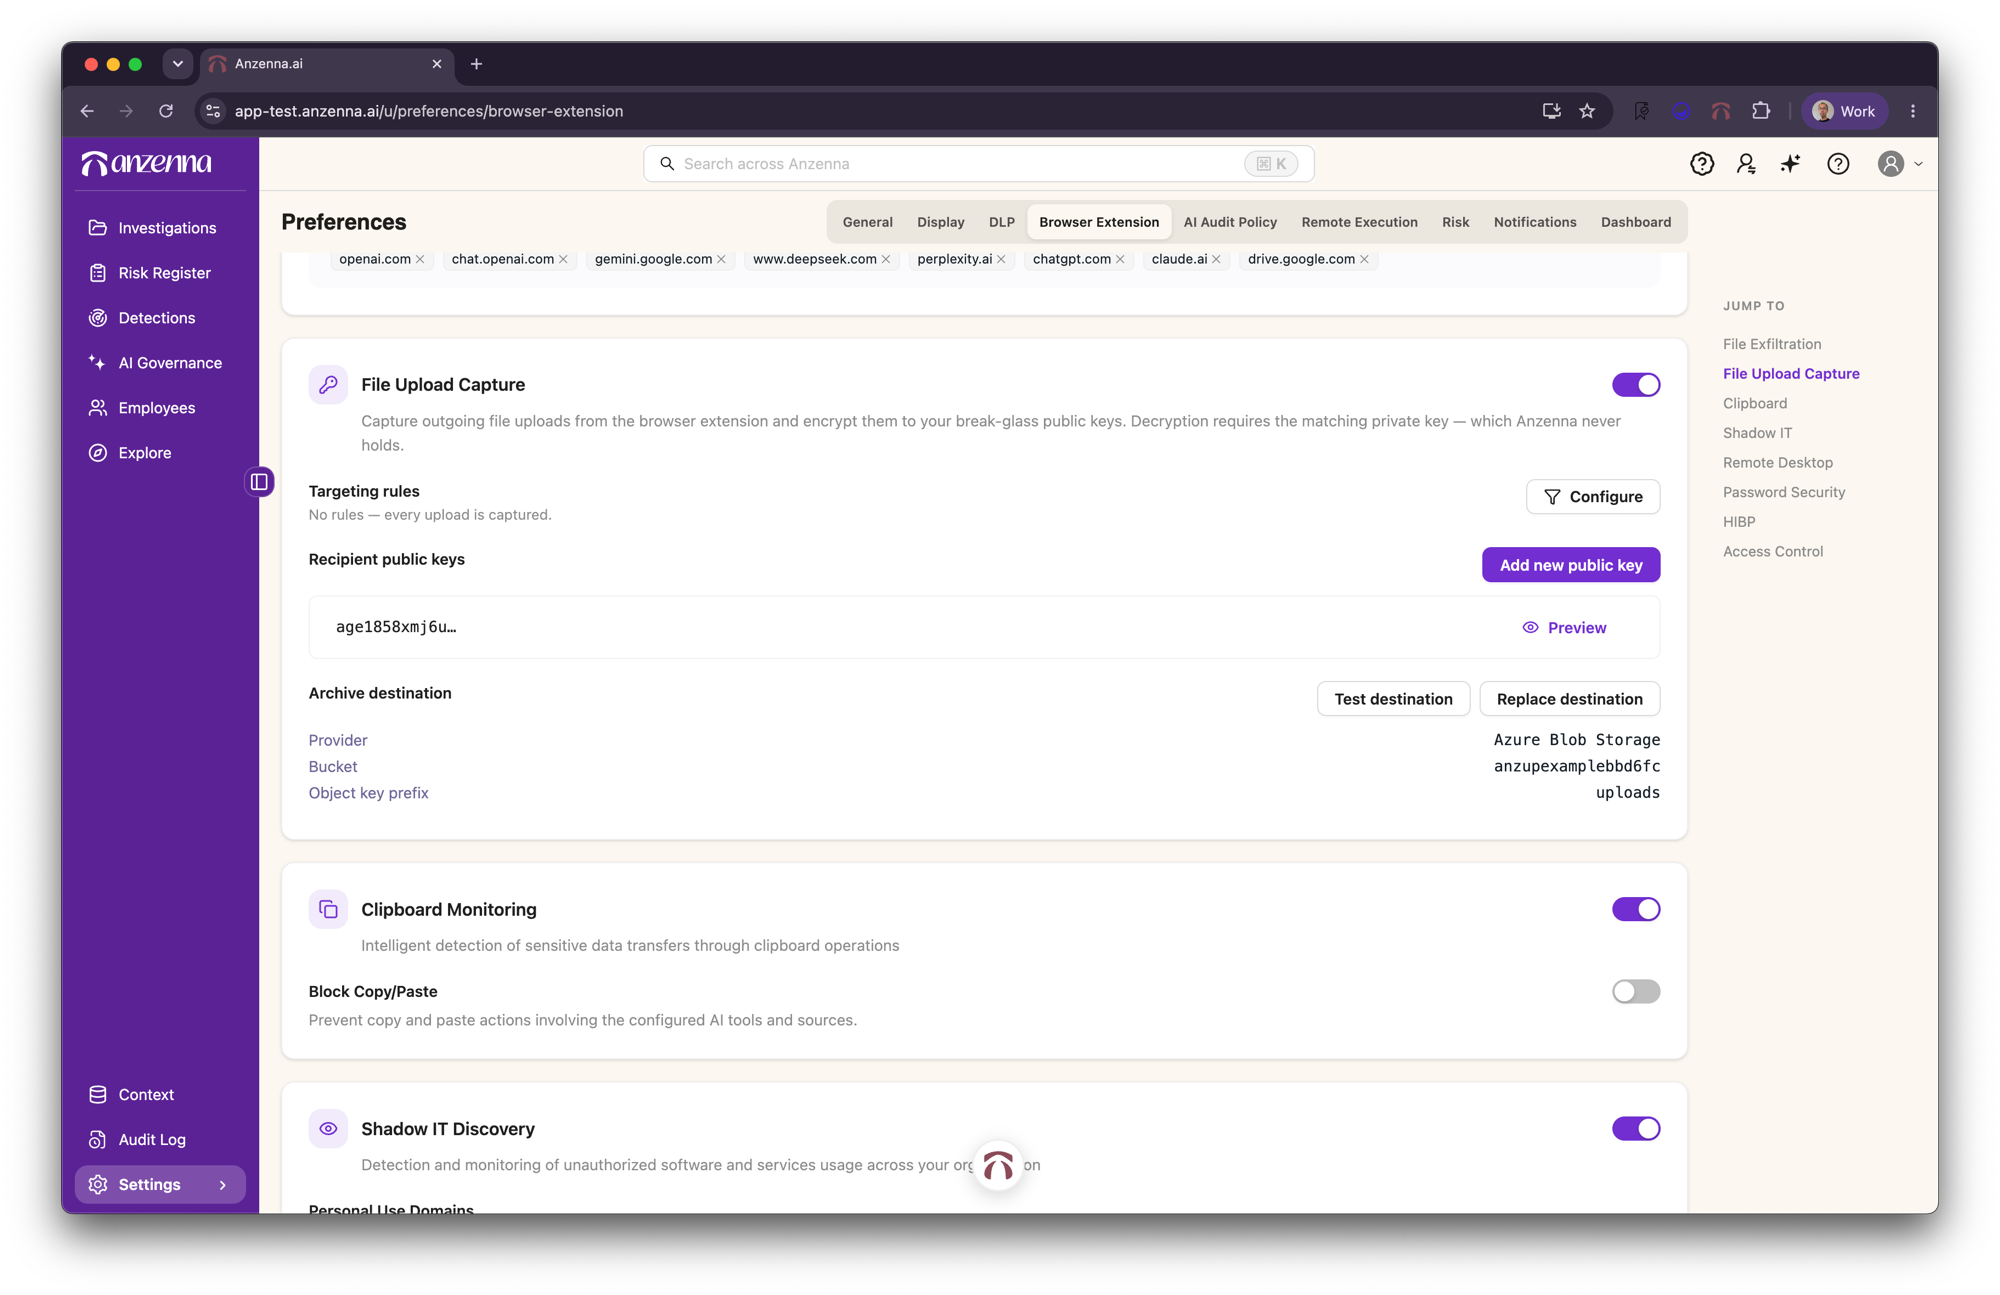
Unlike a SAS token or account key, nothing secret is saved here. Anzenna writes through the federated app token — the only thing standing between Anzenna and your data is the container-scoped RBAC grant, which you control and can revoke at any time.
3c. Turn capture on
Flip the File Upload Capture toggle at the top of the section to on.
Save the Browser Extension settings.
Part 4: Verify capture end-to-end
Pick a test device that has the Anzenna extension installed and is enrolled in the Anzenna agent.
Confirm the device is currently considered managed. Upload credentials only mint for devices that have recently checked in with the agent. There is no self-serve way to check this today — contact Anzenna support at support@anzenna.ai and ask them to confirm the device shows a recent check-in before you test.
On that device, upload a small test file to any web destination from the browser (e.g. attach a file to a Gmail draft).
In the Azure portal, open the container and confirm a new blob appears within ~1 minute. Archived files use the
.anzuextension.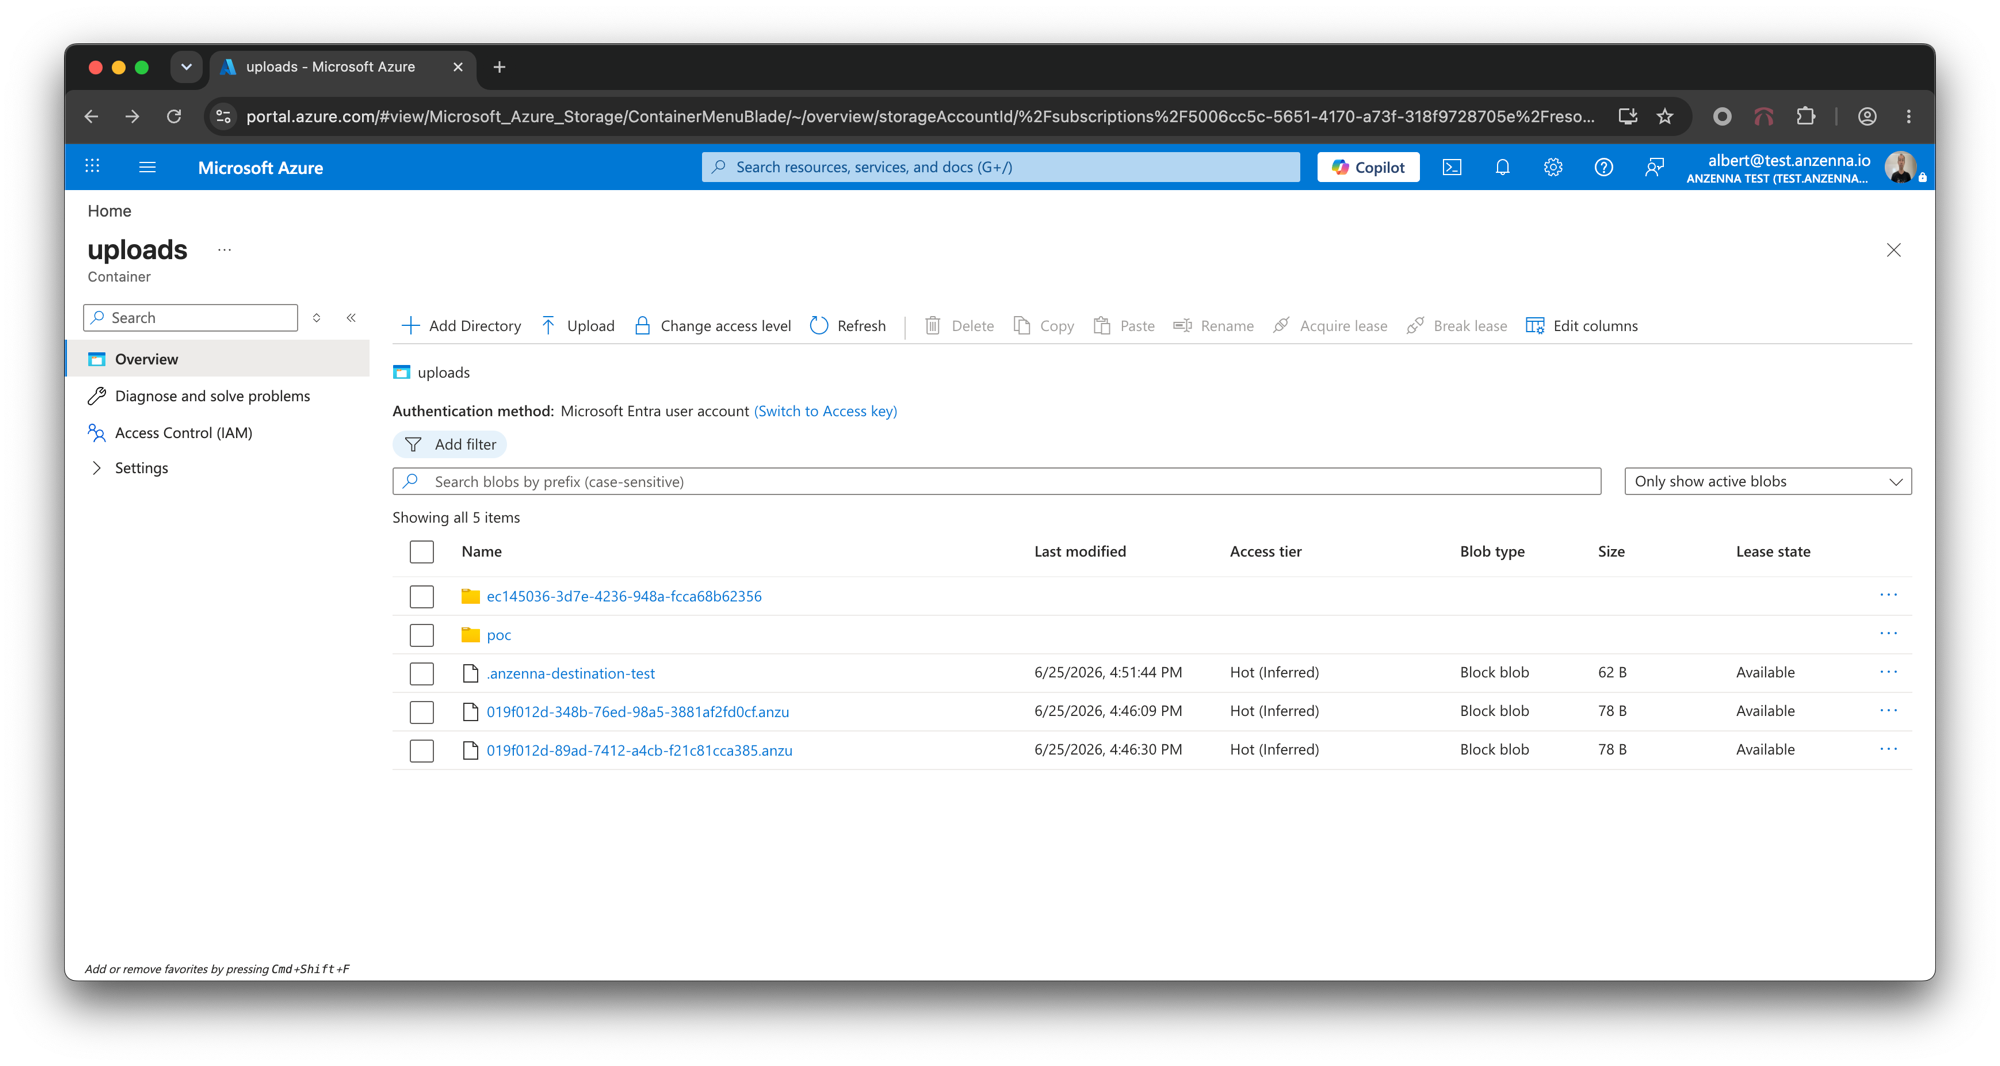
Download the blob and decrypt it (next section) to confirm the round trip works before relying on it during an investigation.
Part 5: Decrypt an archived file
Each archived .anzu blob is a small envelope: a 10-byte fixed
header, a plaintext JSON manifest (filename, SHA-256, upload destination,
timestamp, person ID, recipient list), then the age-encrypted file body.
Decryption happens on your workstation with the matching private key — Anzenna
is not in the path.
Anzenna ships a small Go CLI, anzenna-upload-decrypt, that reads
the envelope, prints the manifest, and writes the decrypted file. Contact
Anzenna support at support@anzenna.ai for the binary. The wire
format is also documented (4-byte magic ANZU, 2-byte version,
4-byte big-endian manifest length, JSON manifest, then a standard age v1
ciphertext) so any age-compatible tool can decrypt the body once the header is
stripped.
Download the
.anzublob from the container to the workstation that holds the private key.Print the manifest to confirm what the file is and when it was captured:
./anzenna-upload-decrypt -i envelope.anzu --print-manifestDecrypt it:
./anzenna-upload-decrypt -i envelope.anzu -keyfile anzenna-upload-archive.identityThe plaintext is written to
./<filename-from-manifest>by default; override with-o.Compare the SHA-256 of the decrypted output against the
sha256field in the manifest to confirm the file matches what was uploaded.
Need help? Contact Anzenna Support at support@anzenna.ai for assistance.