Configure File Upload Capture (AWS)
File Upload Capture archives a copy of every file your employees upload through the browser. Each file is encrypted on the device with your public key before it leaves the browser, and written directly to an S3 bucket in your AWS account. Anzenna mediates the upload but never holds the private key and never sees the file contents.
This guide walks an Anzenna admin through the one-time setup: generate a recipient keypair, provision the destination bucket and IAM role in your AWS account, register both with Anzenna, and turn capture on.
Prerequisites
File Upload Capture must be turned on for your tenant first — contact Anzenna support at support@anzenna.ai before you begin.
What gets captured
By default, every file upload from a supported browser is captured. You can optionally configure rules to narrow scope by file extension, MIME type, max file size, host (which site the upload targeted), or person (which employees are in scope). Without rules, the default is everything.
The user's device must be currently recognised as managed. Upload credentials are only minted for devices that have recently checked in with the Anzenna agent. A device that has not checked in recently — or is unmanaged — is denied and the upload proceeds unarchived.
The private key never leaves your custody. If every copy is lost, every file encrypted to the matching public key is unrecoverable — there is no Anzenna-side backdoor. Store the private key in a vetted password manager or HSM before registering the public key in Anzenna.
Step-by-Step Instructions
Part 1: Generate a recipient keypair
The extension encrypts each captured upload — using the
age encryption format
— to one or more recipient public keys that you register with Anzenna. The matching private keys stay with you and are used to decrypt archived files during an investigation.
Install the
ageCLI (Homebrew:brew install age; apt:apt install age).Generate the keypair to a protected file:
age-keygen -o anzenna-upload-archive.identityThe command prints the public key on stdout; the file contains the matching private key prefixed with
AGE-SECRET-KEY-1….Move
anzenna-upload-archive.identityinto a password manager entry or vault. Do not check it into source control or share it over chat.Copy the public key (the
age1…line printed during generation). That is what you will paste into Anzenna in Part 3.
Part 2: Provision the destination in AWS
The encrypted file is written directly from the browser to an S3 bucket in your AWS account. Anzenna issues a single-use upload URL for each file by assuming a cross-account IAM role you define; it has no ability to read, list, or delete anything in your bucket.
Rather provision with Terraform? Use the Provision with Terraform guide instead — it creates the same KMS key, S3 bucket, and IAM role in one terraform apply. Then come back and continue at Part 3 below.
The console walkthrough below provisions everything by hand: a customer-managed KMS key, an S3 bucket (versioning + SSE-KMS + Bucket Keys
- public access blocked + TLS-only + SSE-KMS-only PutObject), and the
cross-account IAM role Anzenna assumes. Anzenna's federation role only
assumes roles whose name starts with
anzenna-upload-, so the role's name is built from a customer label you choose.
2a. Pick a customer label and generate an External ID
Choose a short customer label (lowercase, alphanumeric or hyphens, 2-32 chars). It becomes part of the IAM role name, KMS alias, and bucket name throughout this part. Example:
yourorg.Generate a random External ID — the shared secret pinned in the IAM role's trust policy. Without it, no other AWS principal can assume the role even if they learn its ARN.
openssl rand -hex 32Store the value in your password manager. You'll paste it into the trust policy in 2e and into Anzenna in Part 3.
2b. Pick an AWS region
In the AWS console, switch to the region that will hold the archive. It must satisfy your data-residency requirements for the employees you capture. Stay in this region for every step below — the KMS key, S3 bucket, and console session must line up.
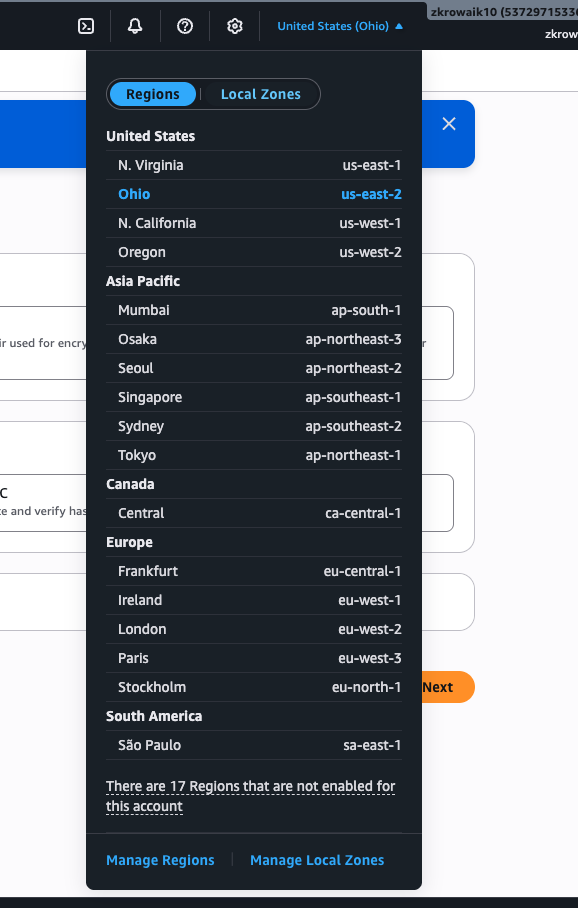
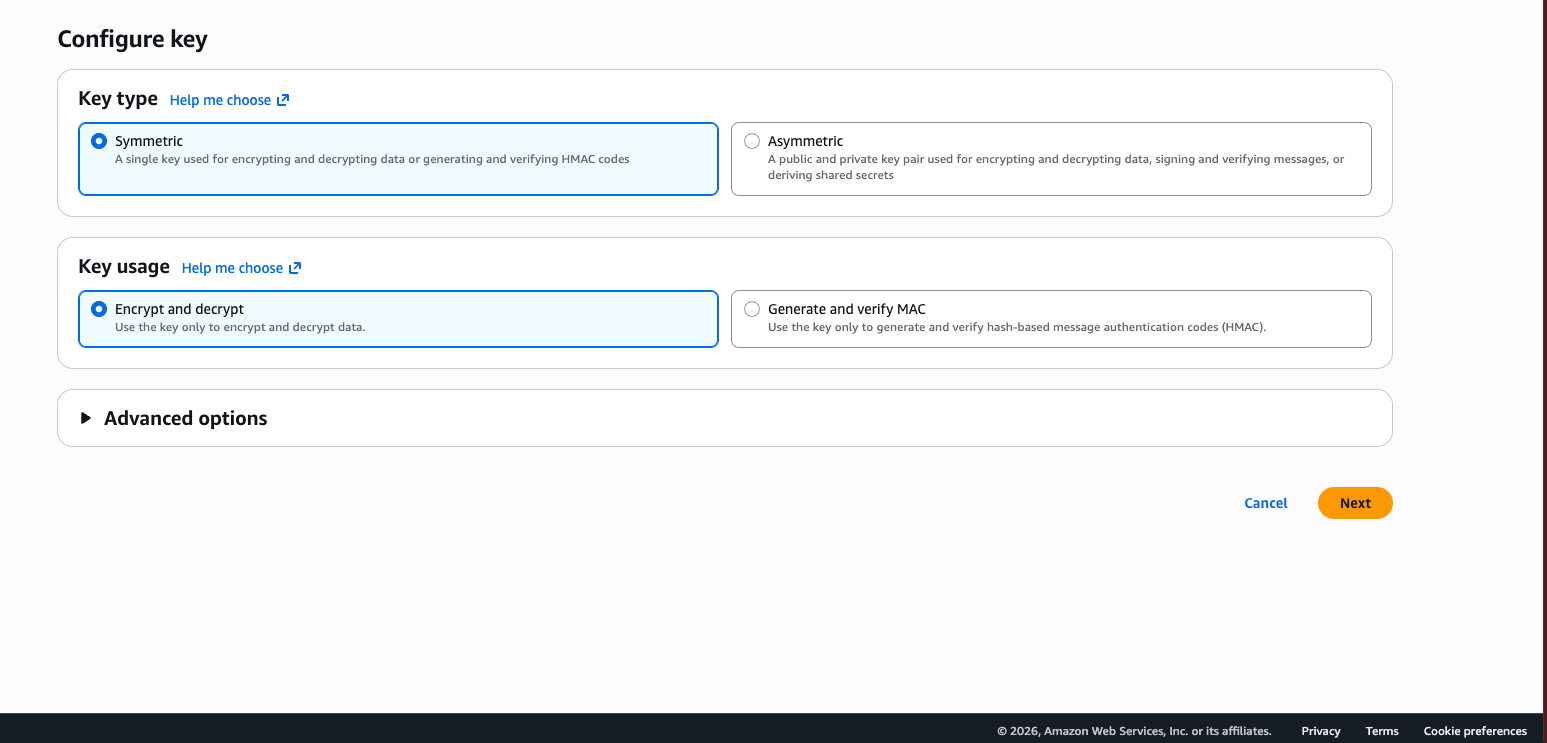
2c. Create the KMS key
Navigate to KMS > Customer managed keys > Create key.
Configure key:
Key type: Symmetric
Key usage: Encrypt and decrypt
Click Next
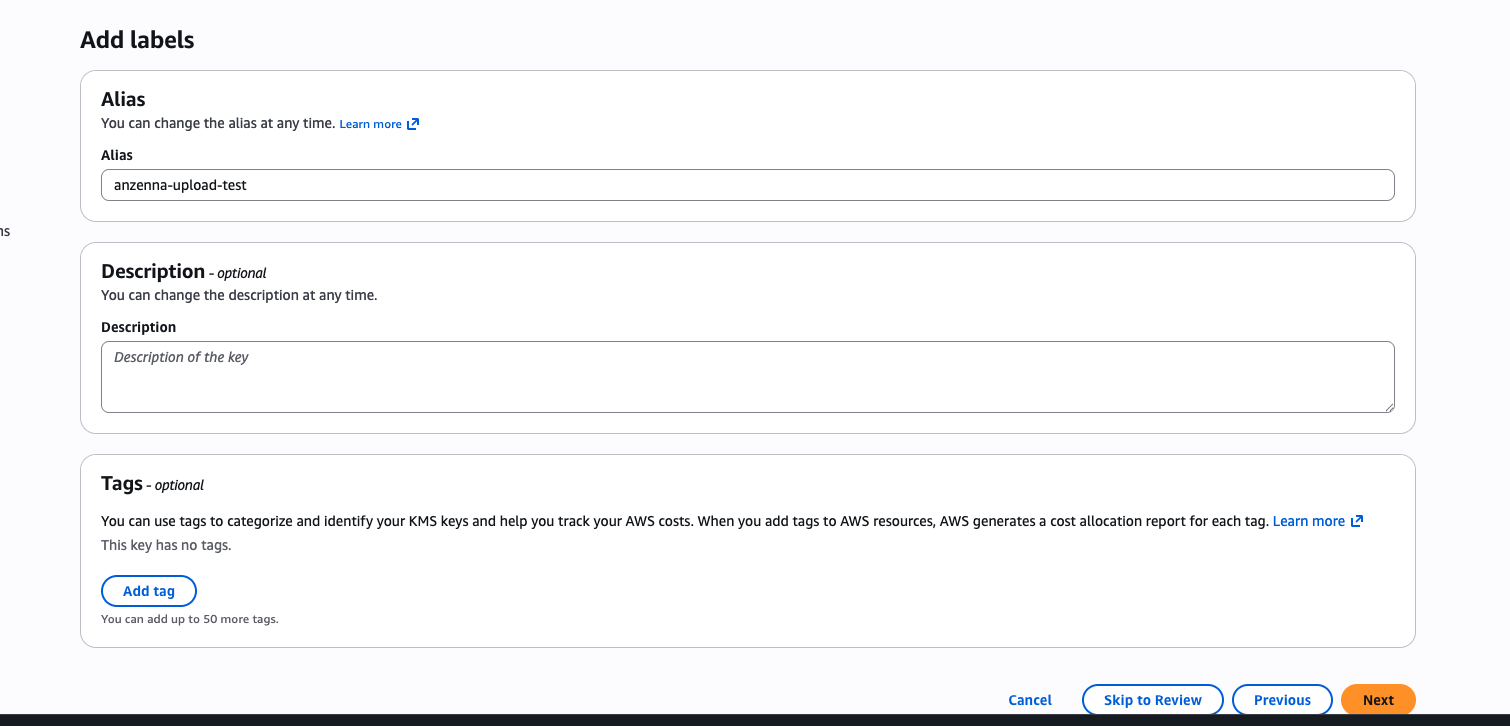
Add labels:
Alias:
anzenna-upload-<customer_label>(e.g.anzenna-upload-yourorg)- Description:
Anzenna upload archive Click Next
Define key administrative permissions:
Key administrators: pick the IAM principals in your account that should manage this key. Do not add any Anzenna principal.
Click Next
Define key usage permissions:
Key usage permissions: leave this page empty — the upload role is granted access through the key policy in 2f.
Click Next
On the Review page:
Click Finish
Open the new key and copy its ARN — you'll need it in 2d (bucket default encryption) and 2e (role permissions). Keep this tab open; you'll edit the key policy in 2f.
2d. Create the S3 bucket
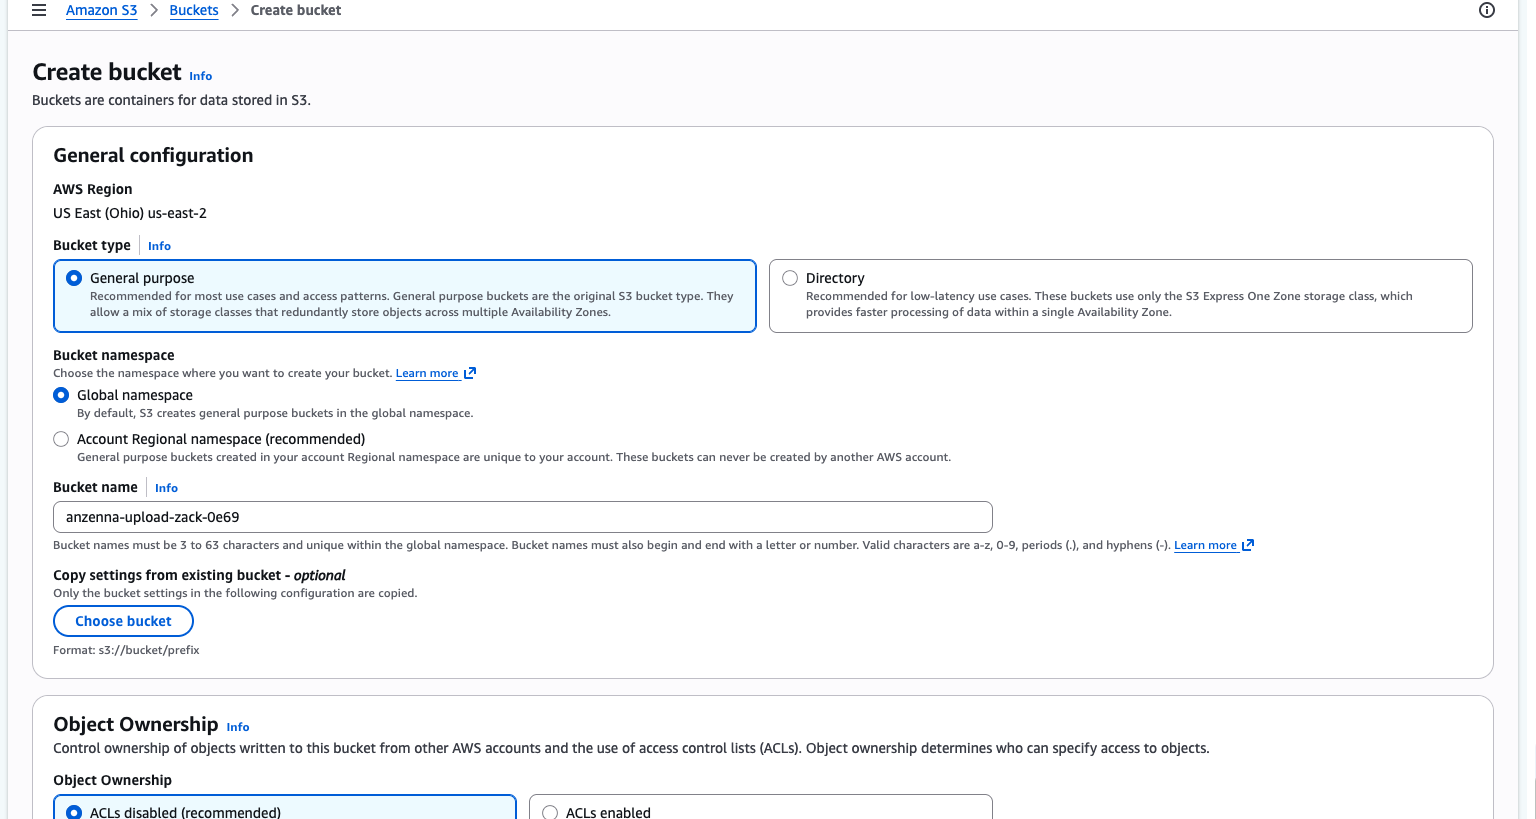
Navigate to S3 > Create bucket.
General configuration:
Bucket name:
anzenna-upload-<customer_label>-<random-suffix>— bucket names are globally unique across all AWS accounts, so add a short random suffix (e.g. 8 hex chars fromopenssl rand -hex 4) to avoid collisions.Object Ownership: leave the default ACLs disabled (Bucket owner enforced).
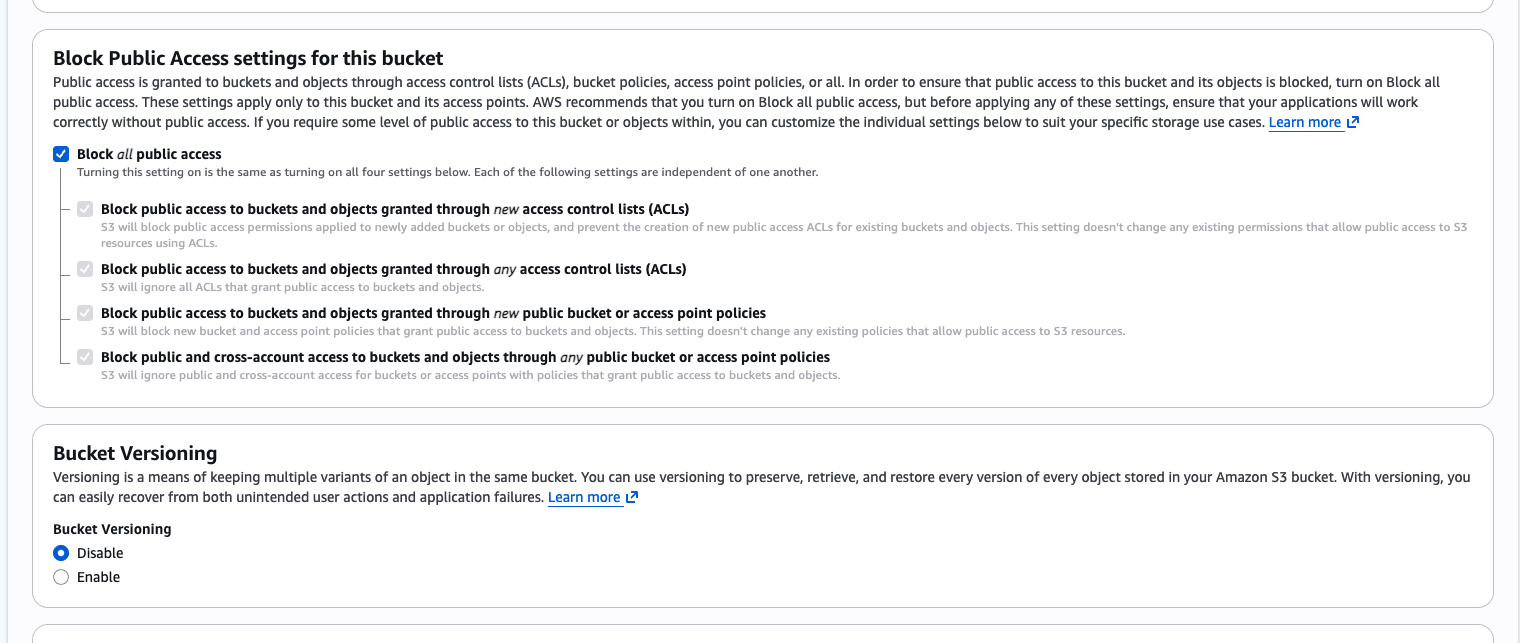
Block Public Access settings for this bucket: leave all four blocks checked (the default).
Bucket Versioning: Enable.
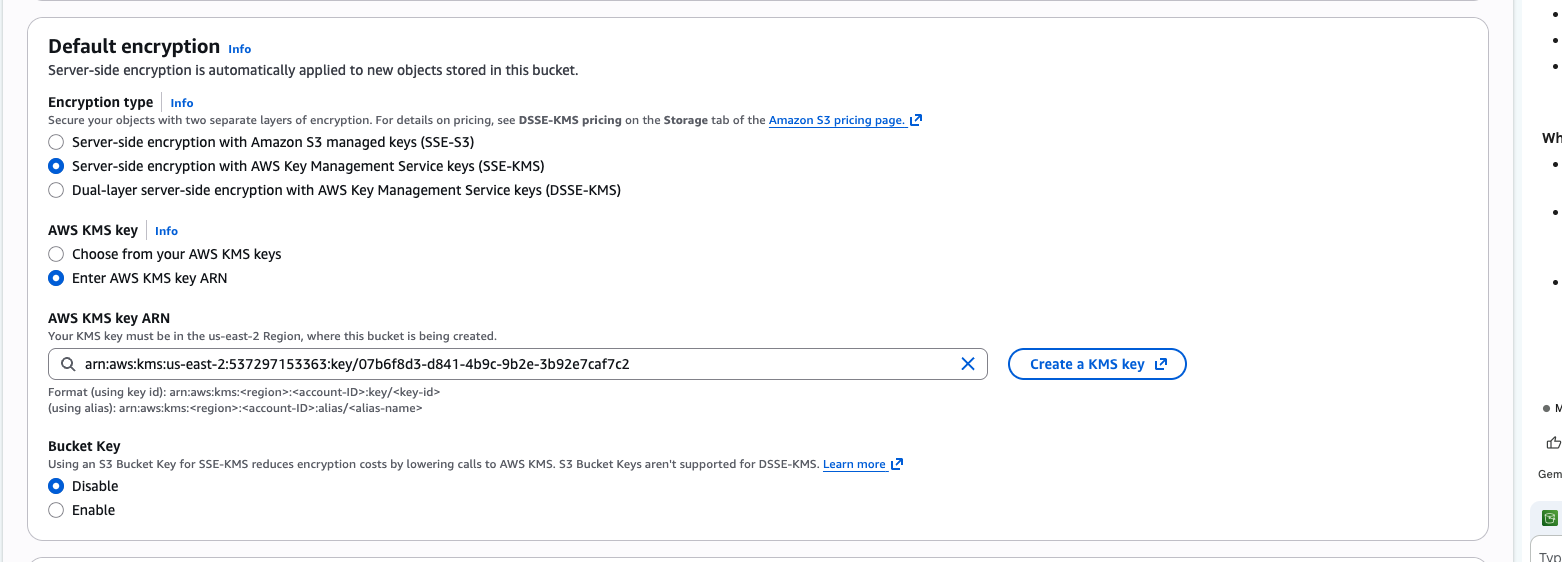
Default encryption:
Encryption type: Server-side encryption with AWS Key Management Service keys (SSE-KMS)
AWS KMS key: Choose from your AWS KMS keys and select the alias
anzenna-upload-<customer_label>from 2c — or pick Enter AWS KMS key ARN and paste the key ARN from 2cBucket Key: Enable — required; it cuts KMS API costs ~100× at fleet scale
Click Create bucket
Add the bucket policy. Open the new bucket, go to Permissions > Bucket policy > Edit, paste the policy below (replace
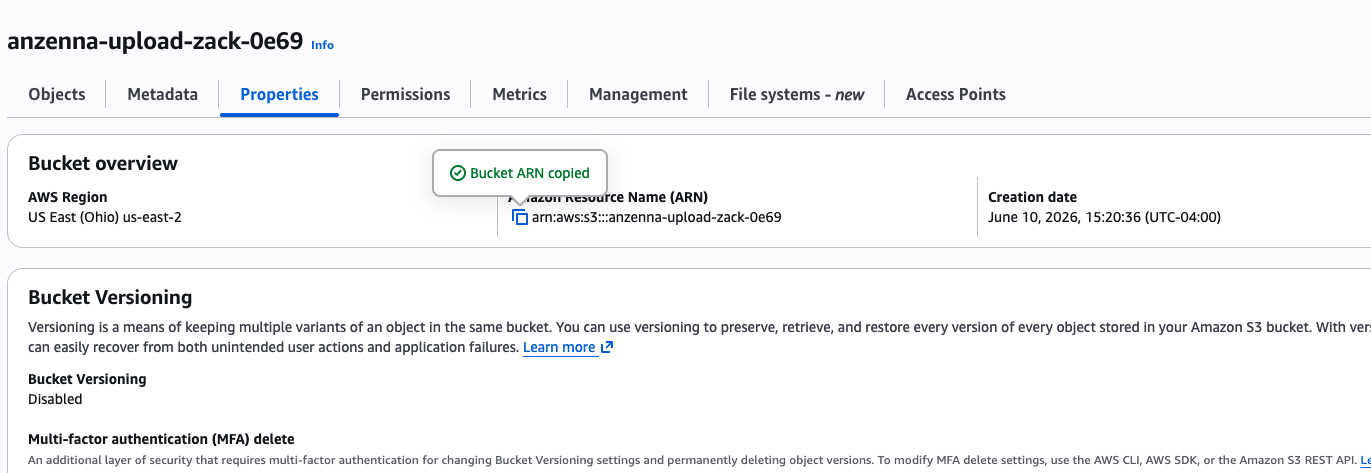
<BUCKET_NAME>with the bucket name, all three occurrences), and Save.{"Version": "2012-10-17","Statement": [{"Sid": "DenyInsecureTransport","Effect": "Deny","Principal": "*","Action": "s3:*","Resource": ["arn:aws:s3:::<BUCKET_NAME>","arn:aws:s3:::<BUCKET_NAME>/*"],"Condition": {"Bool": { "aws:SecureTransport": "false" }}},{"Sid": "DenyWrongSSE","Effect": "Deny","Principal": "*","Action": "s3:PutObject","Resource": "arn:aws:s3:::<BUCKET_NAME>/*","Condition": {"StringNotEqualsIfExists": {"s3:x-amz-server-side-encryption": "aws:kms"}}}]}Copy the bucket's ARN (Properties tab) — you'll need it in 2e.
2e. Create the IAM role
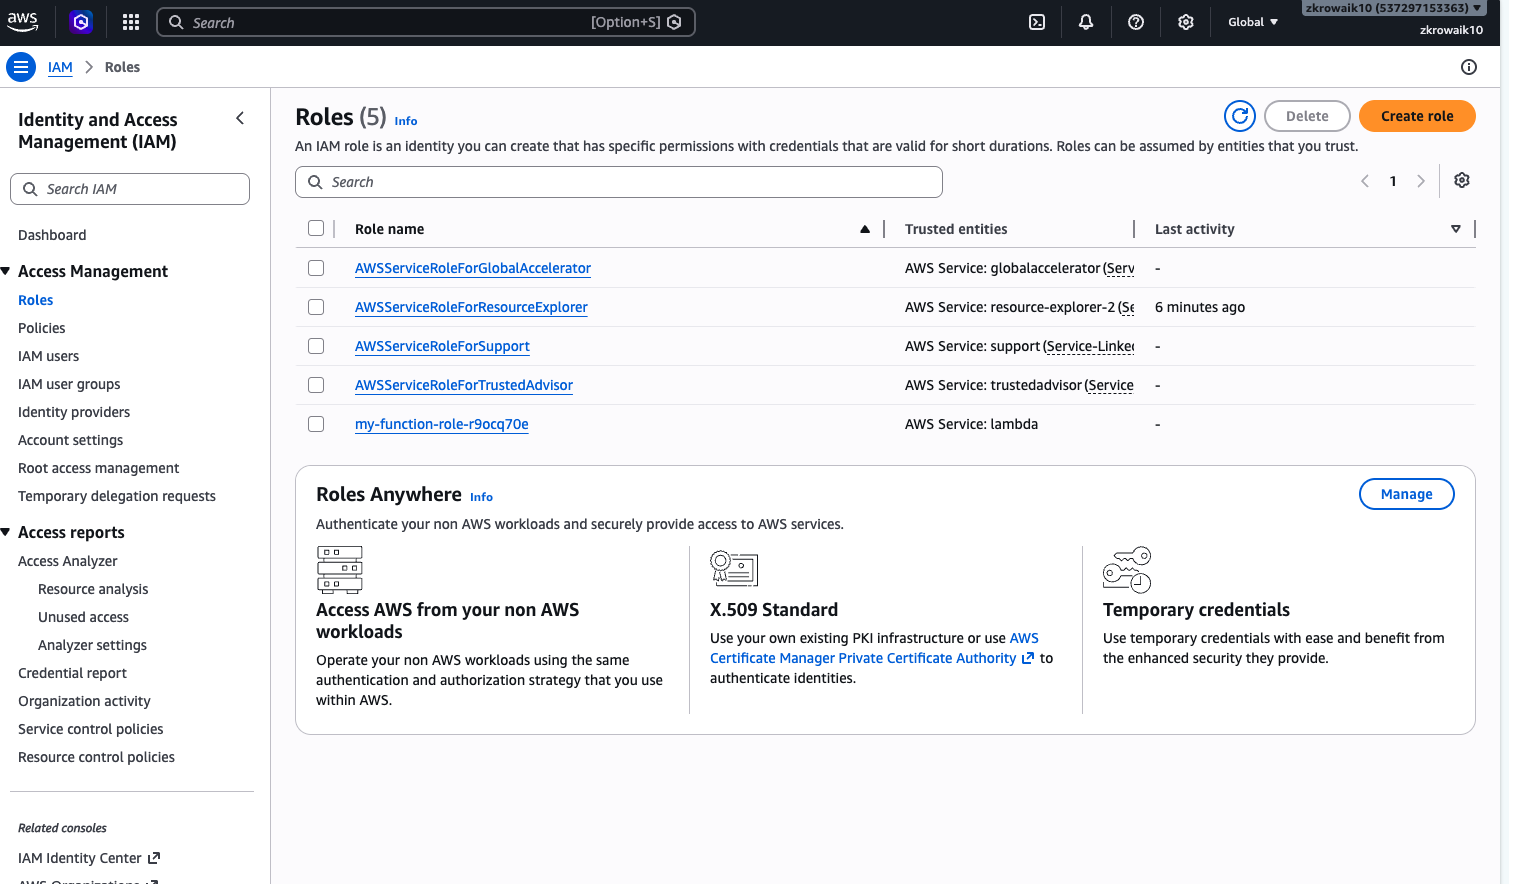
Navigate to IAM > Roles > Create role.
Select trusted entity:
Trusted entity type: Custom trust policy
Paste the JSON below, substituting your External ID from 2a
Click Next
{"Version": "2012-10-17","Statement": [{"Effect": "Allow","Principal": {"AWS": "arn:aws:iam::590183739574:role/anzenna-upload-archival"},"Action": "sts:AssumeRole","Condition": {"StringEquals": {"sts:ExternalId": "<EXTERNAL_ID_FROM_2A>"}}}]}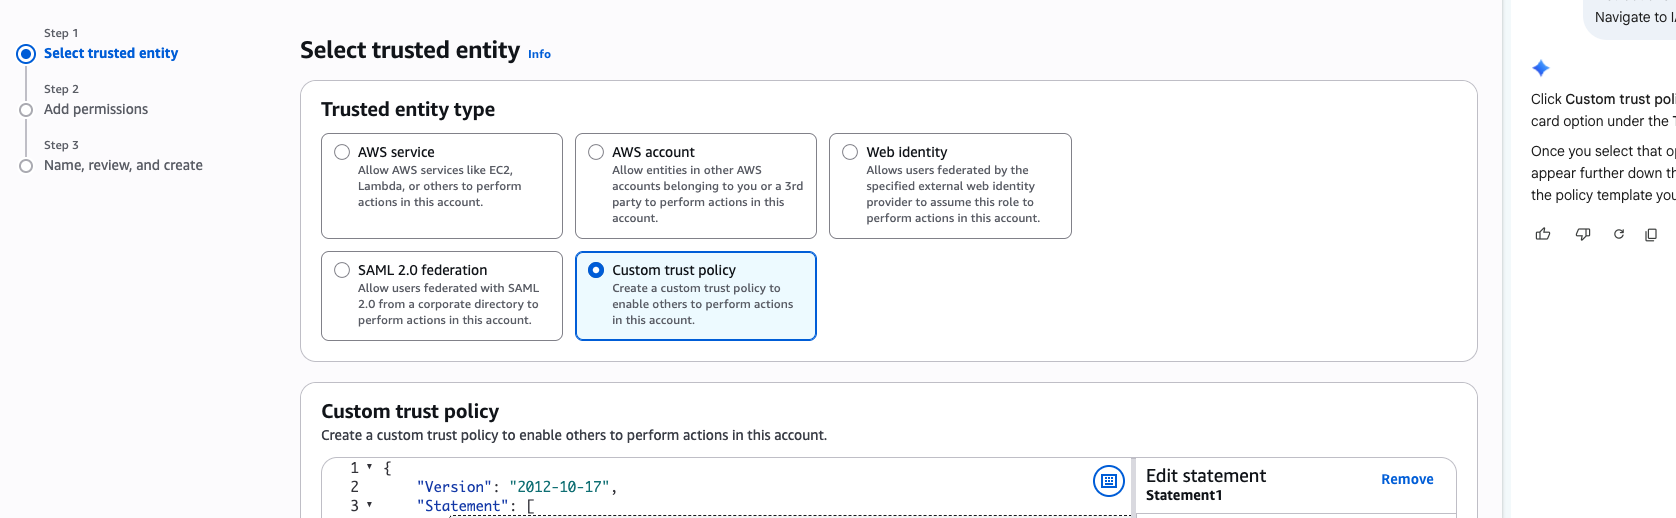
Add permissions:
Skip — you'll attach an inline policy after the role is created.
Click Next
Name, review, and create:
Role name:
anzenna-upload-<customer_label>— theanzenna-upload-prefix is required; Anzenna's federation role only assumes roles whose name matches that pattern.Click Create role
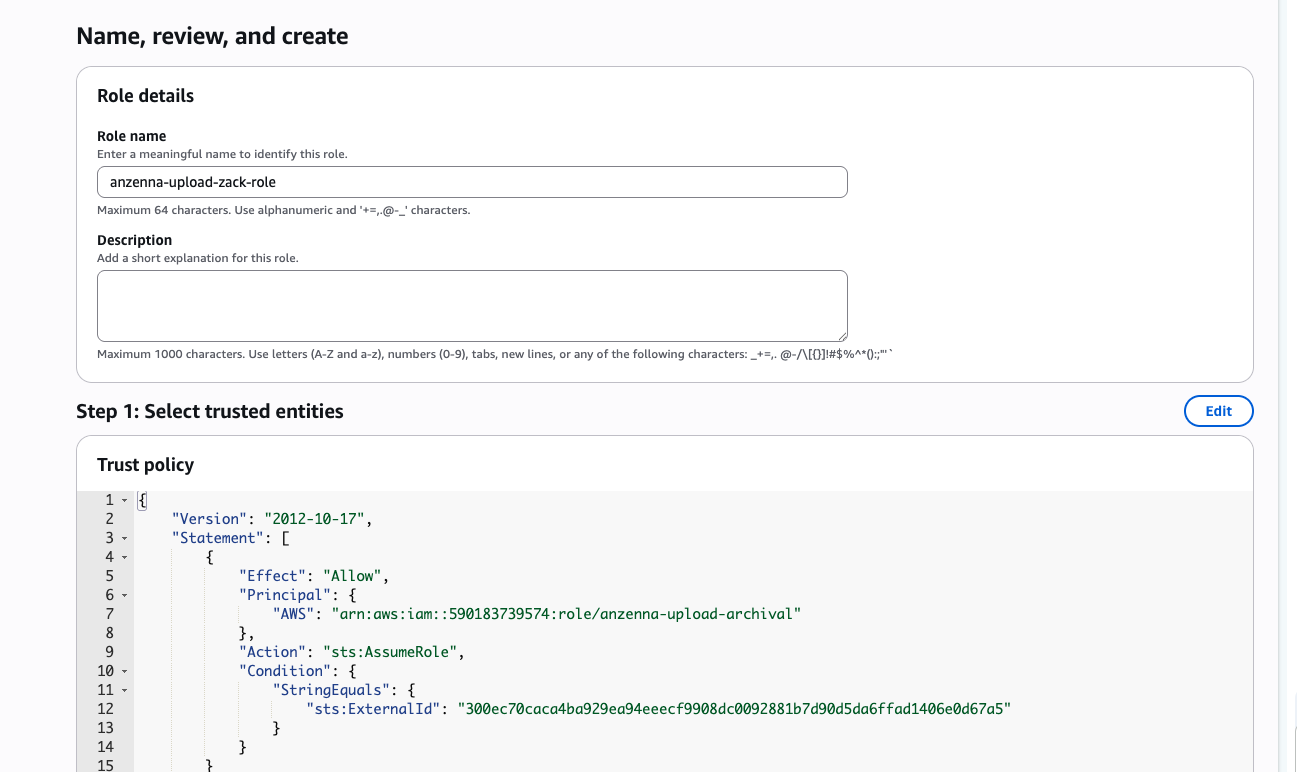
Attach the permissions policy. Open the new role and, on the Permissions tab, click Add permissions > Create inline policy, then switch the editor to JSON and paste the policy below (substitute the bucket ARN from 2d and the KMS key ARN from 2c):
{"Version": "2012-10-17","Statement": [{"Effect": "Allow","Action": "s3:PutObject","Resource": "<BUCKET_ARN>/uploads/*","Condition": {"StringEquals": {"s3:x-amz-server-side-encryption": "aws:kms","s3:x-amz-server-side-encryption-aws-kms-key-id": "<KMS_KEY_ARN>"}}}]}Click Next
On the Review and create page, set Policy name to
put-objectsand click Create policy
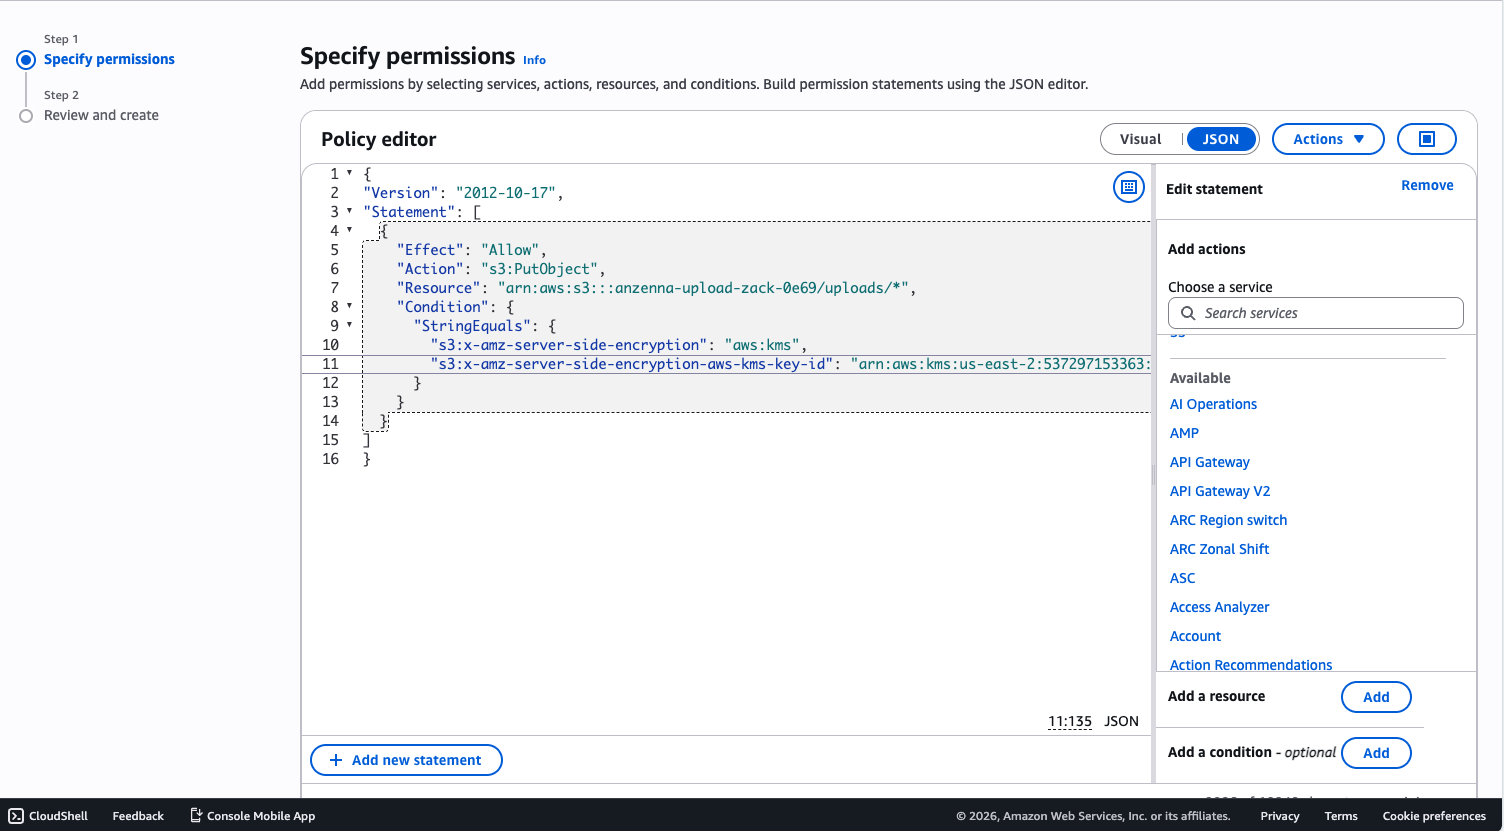
Copy the role's ARN from the role summary — you'll paste it into Anzenna in Part 3, and also into the KMS key policy in 2f.
2f. Grant the role access in the KMS key policy
KMS requires both an IAM policy grant (2e) and a key policy
grant — they are AND'd, not OR'd. Without this step,
GenerateDataKey will fail at upload time even though the IAM
policy looks correct.
Switch back to the KMS tab from 2c (or navigate to KMS > Customer managed keys and open the key).
Open the policy editor. On the key's detail page the Key policy tab is selected by default and shows the friendly view (Key administrators, Key users, etc.).
In the Key policy panel, click Switch to policy view (top-right of the panel) to see the raw JSON
Click Edit
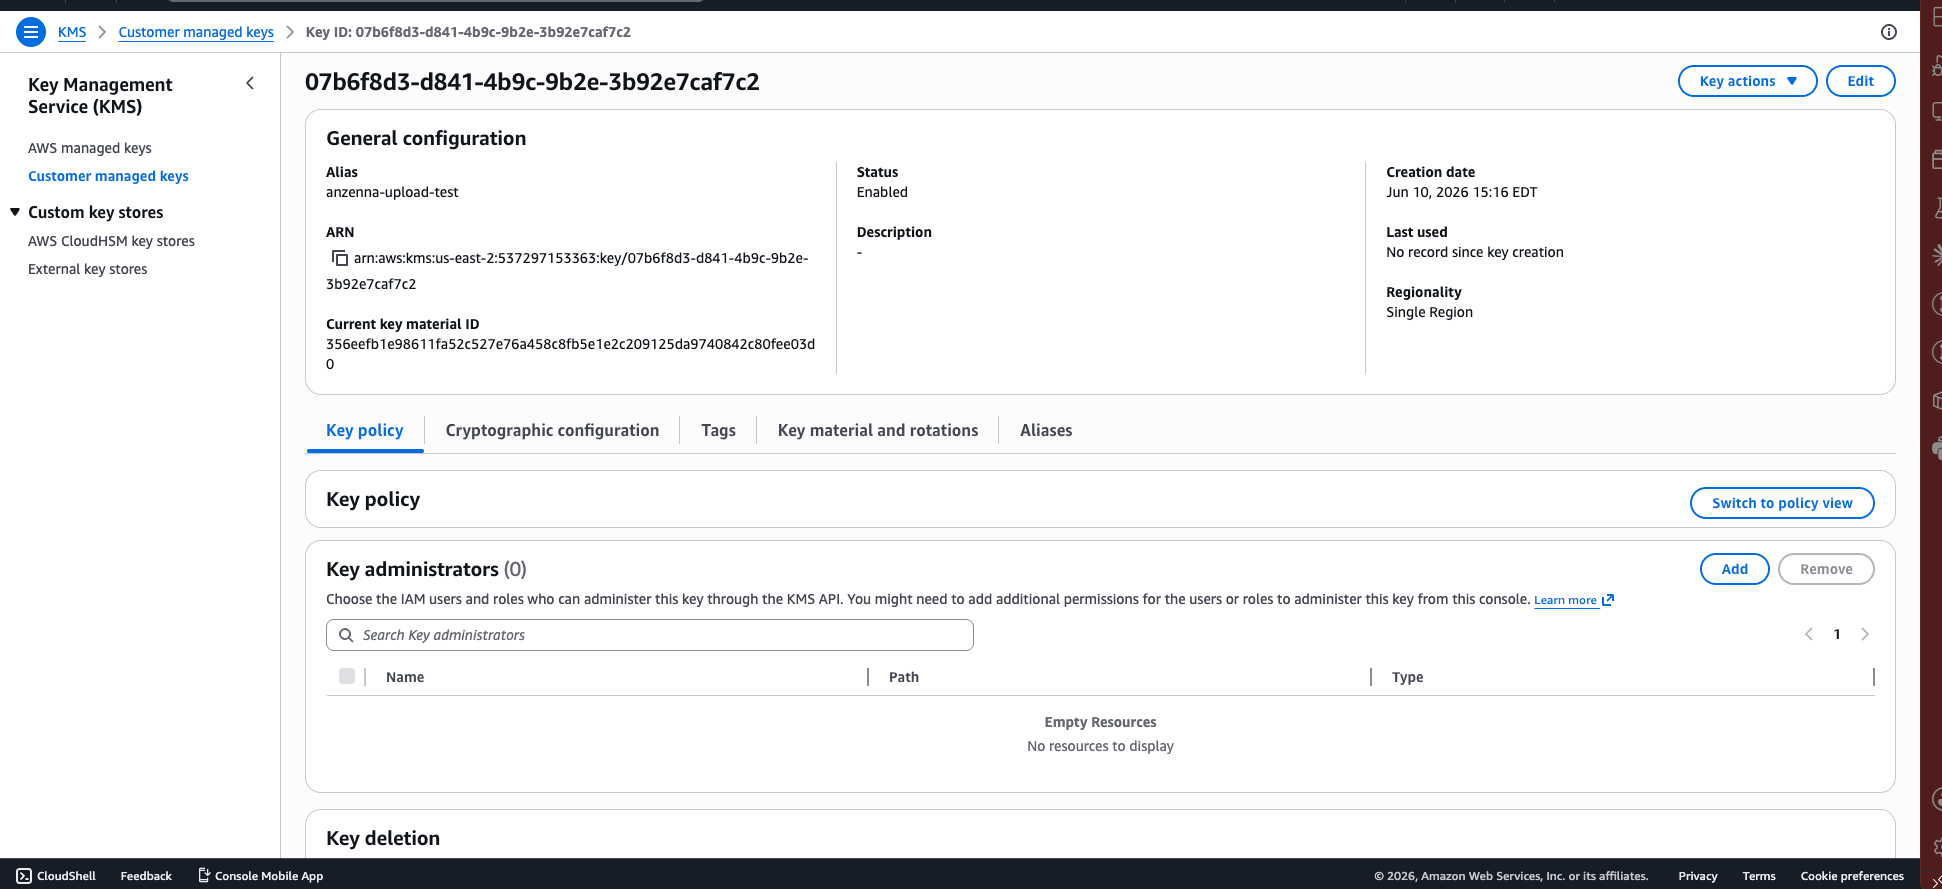
Replace the policy with the JSON below. Substitute your AWS account ID (the 12-digit number, top right of the console) and the upload role ARN from 2e.
{"Version": "2012-10-17","Statement": [{"Sid": "EnableRootPermissions","Effect": "Allow","Principal": { "AWS": "arn:aws:iam::<YOUR_AWS_ACCOUNT_ID>:root" },"Action": "kms:*","Resource": "*"},{"Sid": "AllowUploadRoleEncrypt","Effect": "Allow","Principal": { "AWS": "<UPLOAD_ROLE_ARN_FROM_2E>" },"Action": ["kms:Encrypt","kms:GenerateDataKey","kms:DescribeKey"],"Resource": "*"}]}Click Save changes
Part 3: Register everything in Anzenna
Log into
Anzenna
.
Navigate to Settings > Browser Extension.
Find the File Upload Capture section.
3a. Add the recipient public key
Click Add new public key.
Acknowledge the private-key custody warning.
Paste the public key from Part 1 (starts with
age1…) into the text box and click Add key.Repeat for any additional recipients. Each archived file is a single object in S3 — adding more recipients just means more private keys can decrypt that one object, which is useful as a break-glass spare.
3b. Add the archive destination
Click Add destination.
Fill in the fields with the values you collected while provisioning (the Terraform output names are noted for the IaC path):
Bucket name — from 2d (TF:
bucket_name).Region — from 2b (TF:
region).Object key prefix —
uploads/.Upload role ARN — from 2e (TF:
upload_role_arn).KMS key ARN — from 2c (TF:
kms_key_arn).External ID — from 2a (TF:
terraform output -raw external_id).
Click Save destination.
Click Test destination. Anzenna assumes your upload role and writes a small test object under the
uploads/prefix. A green Test upload succeeded confirms the trust policy, role permissions, and KMS key policy are all wired correctly. If it fails, the error names the specific AWS denial to fix.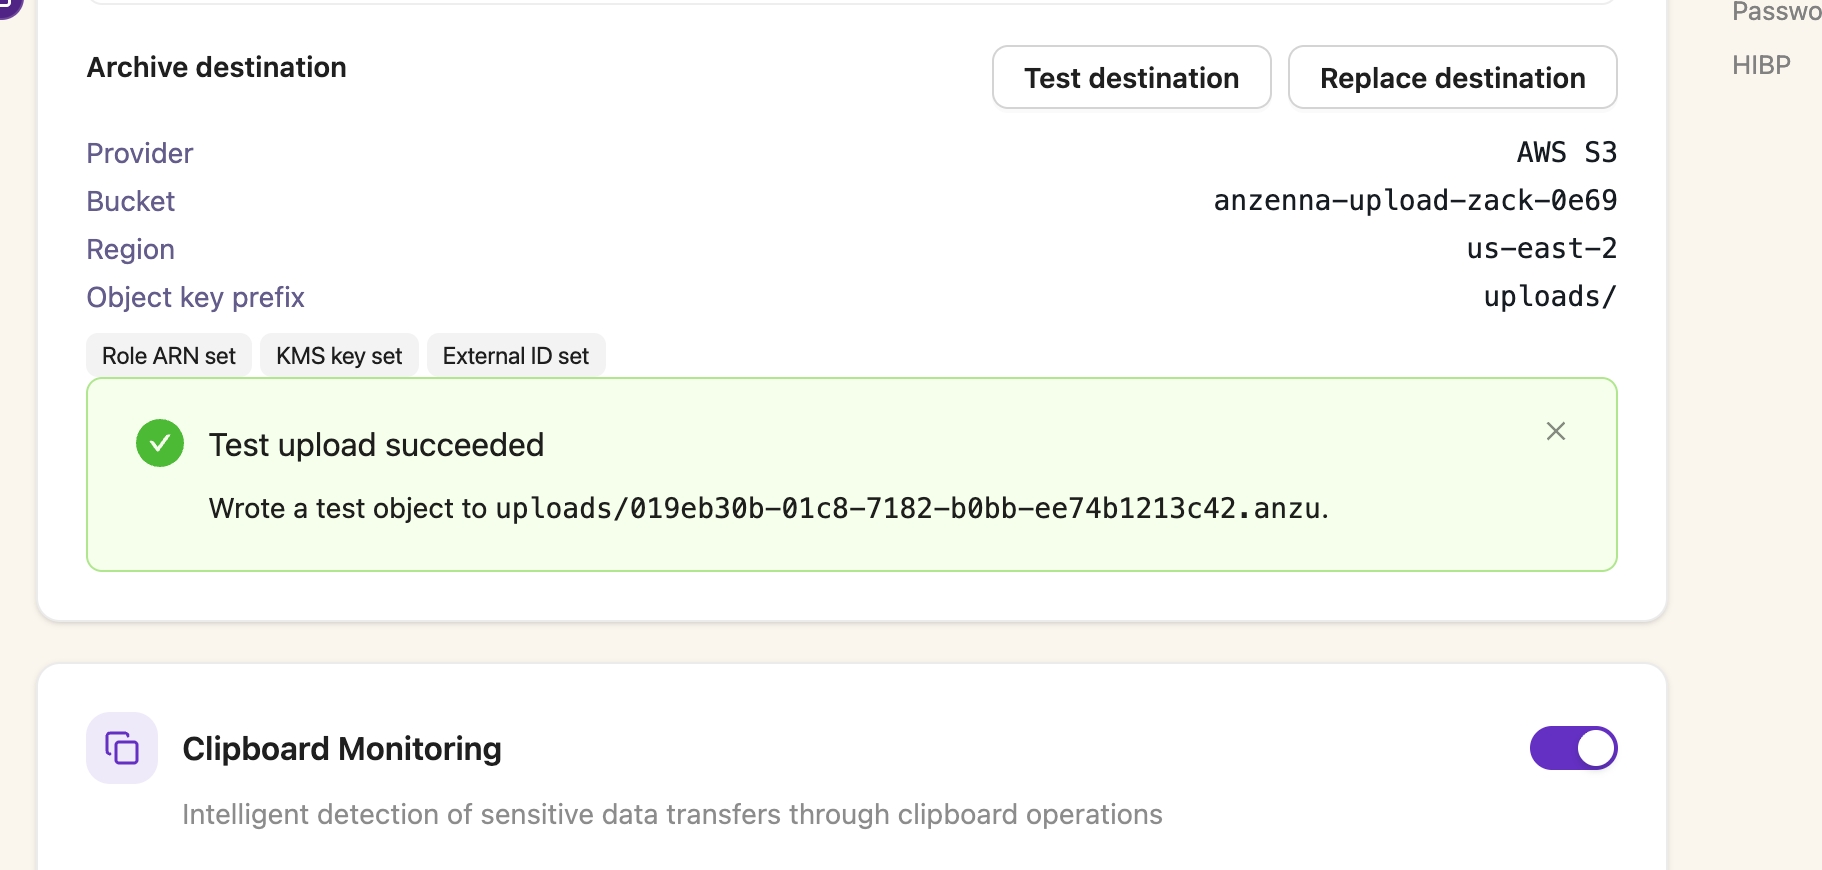
Role ARN, KMS key ARN, and External ID are stored write-only — Anzenna does not echo them back to the UI. When you re-open the modal to change anything else, leave these fields blank to keep the stored values, or paste new values to replace them.
3c. Turn capture on
Flip the File Upload Capture toggle at the top of the section to on.
Save the Browser Extension settings.
Part 4: Verify capture end-to-end
Pick a test device that has the Anzenna extension installed and is enrolled in the Anzenna agent.
Confirm the device is currently considered managed. Upload credentials only mint for devices that have recently checked in with the agent. There is no self-serve way to check this today — contact Anzenna support at support@anzenna.ai and ask them to confirm the device shows a recent check-in before you test.
On that device, upload a small test file to any web destination from the browser (e.g. attach a file to a Gmail draft).
In the AWS console, open the archive bucket and confirm a new object appears under the
uploads/prefix within ~1 minute. Archived files use the.anzuextension.Download the object and decrypt it using the steps in Part 5 to confirm the round trip works before relying on it during an investigation.
Part 5: Decrypt an archived file
Each archived .anzu object is a small envelope: a 10-byte
fixed header, a plaintext JSON manifest (filename, SHA-256, upload
destination, timestamp, person ID, recipient list), then the
age-encrypted file body. Decryption happens on your workstation with the
matching private key — Anzenna is not in the path.
Anzenna ships a small Go CLI,
anzenna-upload-decrypt, that reads the envelope, prints the
manifest, and writes the decrypted file. Contact Anzenna support at
support@anzenna.ai for the binary. The wire format is
also documented (4-byte magic ANZU, 2-byte version, 4-byte
big-endian manifest length, JSON manifest, then a standard age v1
ciphertext) so any age-compatible tool can decrypt the body once the
header is stripped.
Download the
.anzuobject from S3 to the workstation that holds the private key.Print the manifest to confirm what the file is and when it was captured:
./anzenna-upload-decrypt -i envelope.anzu --print-manifestDecrypt it:
./anzenna-upload-decrypt -i envelope.anzu -keyfile anzenna-upload-archive.identityThe plaintext is written to
./<filename-from-manifest>by default; override with-o.Compare the SHA-256 of the decrypted output against the
sha256field in the manifest to confirm the file matches what was uploaded.
Need help? Contact Anzenna Support at support@anzenna.ai for assistance.